


Chapter 4 Recording/Playback
51
4-1 Recording
1
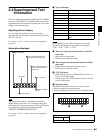
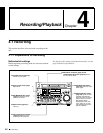
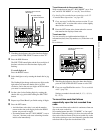
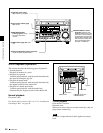
Watching the indicators above the time data display,
press the COUNTER SELECT button to select TC.
2
Press the HOLD button.
The SHUTTLE button lights and the first two digits of
the time code shown in the time data display start
flashing.
To set all digits to 0
Press the RESET button.
3
Select the digits to set by rotating the shuttle dial or jog
dial.
The flashing digits change to the next two digits on the
right when you rotate the shuttle dial or jog dial
clockwise, and to the next two digits on the left when
you rotate it counterclockwise.
4
Set the value for the flashing digits by rotating the
shuttle dial or jog dial while holding the SHUTTLE
button.
5
Repeat steps 3 and 4 until you finish setting all digits.
6
Press the SET button.
• An initial time code value is set and the monitor
returns to the time code display before the HOLD
button was pressed in step 2.
• If extended menu item 627 “RUN MODE” is set to
“free run,” the time code starts advancing from the
initial value immediately.
To set time code to the current time
With extended menu item 627 “RUN MODE” set to “free
run” and 628 “DF MODE” to “on (df),” do as follows.
For details of the extended menu operations, see 8-3-2
“Extended Menu Operations” on page 102.
1
Carry out steps 1 to 5 of the previous section “To set
an initial value” to set the time code to a time slightly
ahead of the current time.
2
Press the SET button at the instant when the current
time matches the displayed time code.
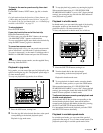
To set user bits
You can record up to eight hexadecimal digits of
information (date, time, clip number, etc.) in the time code
track.
Do as follows.
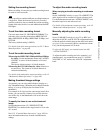
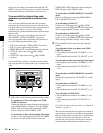
1
Watching the indicators above the time data display,
press the COUNTER SELECT button to select UB.
2
Carry out steps 2 to 6 of the section “To set an initial
value” (page 50).
Settings are made in hexadecimal (0, 1, 2,... 8, 9, A,
B,... E, F).
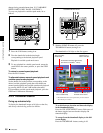
To record time code that follows
sequentially upon the last recorded time
code
You can record time code so that it is continuous from one
clip to the next on the disc.
Set extended menu item 626 “TC MODE” to “int regen”
beforehand. When this setting is in force, the unit reads the
time code of the last frame of the last recorded clip on the
disc before starting to record, and internally generates time
code that follows upon the recorded time code.
REC
VARIABLE
PRESET
PB
L
MIX
R
MONITOR
NETWORK
LOCAL
REMOTE
ACCESS
PHONES
TOP
F REV F FWD
END
PREV
NEXT
PLAY
AUDI O
MONITOR SEL
METER SEL INPUT CH INPUT SEL
VIDEO
INPUT SEL
COUNTER
SELECT
SUB
CLIP
THUMB
NAIL
SET RESET
SHIFT
EJECT
HOLD
STOP
REC
S
H
U
T
T
L
E
J
O
G
V
A
R
MARK1
ESSENCE
MARK
CLIP
MENU
S.SEL
MARK2
IN OUT
ALL/CH-1 CH-2 CH-3 CH-4
OVER
dB
-12
-20
-30
-40
-60
0
CH
- 15
SG DATA
ANASDI
AE8/EBU
OVER
dB
-12
-20
-30
-40
-60
0
CH
- 26
SG DATA
ANASDI
AE8/EBU
OVER
dB
-12
-20
-30
-40
-60
0
CH
- 37
SG DATA
ANASDI
AE8/EBU
OVER
dB
-12
-20
-30
-40
-60
0
CH
- 48
SG DATA
ANASDI
HOURS MINUTES SECONDS FRAMES
AE8/EBU
VITC VITCCOUNTER REC INHVIUB
EDIT KEY INHREMOTE
[
9P iLINK
]
INPUT
i.LINK
SDI
1/2
5/6
3/4
7/8
625
525
IMX
[
50 40 30
]
DVCAM
4 8 CH
18 24 BIT
CMPST
Y-R,B
SG
ALARM
MONITOR
AUDI O
SYS MENU
MENU
4
6
21
3,4
Indicators above the time
data display
Time data display
SHUTTLE button
RESET button
REC
VARIABLE
PRESET
PB
L
MIX
R
MONITOR
NETWORK
LOCAL
REMOTE
ACCESS
PHONES
TOP
F REV F FWD
END
PREV
NEXT
PLAY
AUDI O
MONITOR SEL
METER SEL INPUT CH INPUT SEL
VIDEO
INPUT SEL
COUNTER
SELECT
SUB
CLIP
THUMB
NAIL
SET RESET
SHIFT
EJECT
HOLD
STOP
REC
S
H
U
T
T
L
E
J
O
G
V
A
R
MARK1
ESSENCE
MARK
CLIP
MENU
S.SEL
MARK2
IN OUT
ALL/CH-1 CH-2 CH-3 CH-4
OVER
dB
-12
-20
-30
-40
-60
0
CH
-
15
SG DATA
ANASDI
AE8/EBU
OVER
dB
-12
-20
-30
-40
-60
0
CH
-
26
SG DATA
ANASDI
AE8/EBU
OVER
dB
-12
-20
-30
-40
-60
0
CH
-
37
SG DATA
ANASDI
AE8/EBU
OVER
dB
-12
-20
-30
-40
-60
0
CH
-
48
SG DATA
ANASDI
HOURS MINUTES SECONDS FRAMES
AE8/EBU
VITC VITCCOUNTER REC INHVIUB
EDIT KEY INHREMOTE
[
9P iLINK
]
INPUT
i.LINK
SDI
1/2
5/6
3/4
7/8
625
525
IMX
[
50 40 30
]
DVCAM
4 8 CH
18 24 BIT
CMPST
Y-R,B
SG
ALARM
MONITOR
AUDI O
SYS MENU
MENU
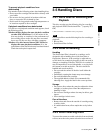
1
Indicators above the time
data display