


11
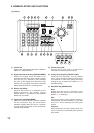
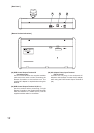
(8) Joystick
In live mode
Performs pan, tilt, and zoom operation of
connected Combination Cameras.
In playback mode
Performs playback, reverse playback, fast
forward playback, and pause operation.
In menu display mode
Moves the cursor (lever position: up, down, left,
or right) and confirms (clockwise lever rotation)
or cancels (counterclockwise lever rotation) the
setting.
Note
Settings cannot be confirmed (clockwise lever
rotation) or cancelled (counterclockwise rotation)
while the camera menu is displayed. Use the
SET key or C key for confirmation or cancellation.
(9) Focus Key [FOCUS]
In live mode
Adjusts the Combination Camera's focus.
In playback mode
(only when temporarily stopped)
Performs instant event access playback.
In menu display mode
Changes set values.
(10) Iris Key [IRIS]
In live mode
Adjusts the camera iris.
Note
This key cannot be used when the communi-
cation method is set to Type A. (Refer to p. 45;
Camera Protocol.)
In playback mode
Performs playback from the earliest image, or
reverses playback from the latest image.
(11) Function Keys [F1
-
F4]
Abbreviation numbers are assigned to these
keys to perform quick display or function
programming.
(Refer to p. 42; Abbreviation Quick display
function, Refer to p. 43; Abbreviation Function
programming.)
(12) Clear Key [C]
Use this key to correct the wrong entry of a ten-
key numerical pad. While the menu is displayed,
this key is used to cancel settings.
(13) Ten-Key Numerical Pad [0
-
9]
Use this key to enter the DVR number, DVR
group number, camera number, position
number, or abbreviated number.
(14) Set Key [SET]
Use this key in conjunction with a ten-key
numerical pad to enter abbreviation numbers.
This key does not work even when pressed
without designating the abbreviated number.
While the menu is displayed, this key is used to
confirm settings.
(15) Search Key [SEARCH]
Displays the search menu.
(16) Playback/Live Key [PLAY/LIVE]
In playback mode
Switches playback to live mode.
The key remains lit while in playback mode.
In live mode
Switches live to playback mode, and playback
begins.
(17) Alarm Reset Key [BUZZER STOP/RESET]
Stops the buzzer tone. Holding down this key for
2 seconds or more stops alarm event recording.
The key flashes during alarm event recording or
when the Digital Video Recorder fails.
(18) Alarm Hold Key [HOLD]
Prevents the Digital Video Recorder from
changing the screen when it receives an alarm
signal. The key lights while in alarm hold mode.
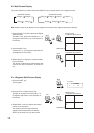
(19) Full-Screen [FULL] /
4-Segment Split-Screen Key
Displays the designated camera output on the
full screen. Pressing this key while the Shift key
continuously lights switches the screen to 4-
segment split -screen display.
(20) Multi-Screen [MULTI] /
9-Segment Split-Screen Key
Displays connected camera outputs on the
multi-split monitor screen. The multi-split screen
display changes in sequence whenever this key
is pressed. Pressing this key while the Shift key
continuously lights switches the screen to 9-
segment split-screen display.
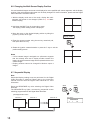
(21) Sequence [SEQUENCE] /
16-Segment Split-Screen Key
Executes the sequential switching operation set
at the Digital Video Recorder. This key remains
lit during sequence operation. Pressing this key
while the Shift key continuously lights switches
the screen to 16-segment split-screen display.
(22) Auto Key [AUTO]
Sets the Combination Camera's auto function to
ON or OFF. This key continuously lights while
the camera is in auto operation mode.
Note
Operation differs depending on the communi-
cations method. (Refer to p. 22; Auto-function
Operation.)