


38
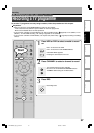
To stop recording
Press STOP.
To pause recording (to omit an unnecessary
portion)
During recording, press PAUSE.
To resume recording, press it again.
Note
• While recording onto a DVD disc, pressing PAUSE on the
recorder automatically creates a new chapter division at
that point.
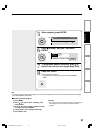
To change a TV channel to be recorded
1) During recording, press PAUSE.
Recording pauses.
2) Press CHANNEL to change the channel.
3) Press PAUSE to resume recording.
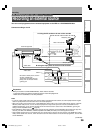
To view a TV programme while recording
another
1) Start recording on this recorder.
2) Press TV/DVR.
3) Using the channel selector of the TV, select a
desired channel on the TV.
If you press the TV/DVR button again, you will go
back to the display that you are recording.
Note
• This function is available only when the TV is connected to
the AV1 (TV) socket.
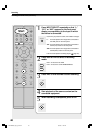
To set an end time of a recording which is in
progress
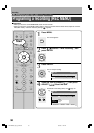
1) During recording, press QUICK MENU.
The Quick Menu appears.
2) Press
/ to select “End time” then press
ENTER .
3) Press
/ to select the recording end time and
power condition after the recording finishes.
(
/ to shift the cursor.)
End time:
Set the hour and minute.
Pwr Off:
On: Power will be on also after the recording.
Off: Power will turn off after the recording.
4) Press ENTER.
Notes
• By setting an end time, it is memorized as a programmed
one, and the indicator in the front panel display
illuminates to indicate that the recorder holds a timer
program of recording.
• The programmed end time must be set for 5 minutes later
than the current time.
Recording a TV programme (Continued)
Recording
Notes
• The number of titles cannot exceed 99 for a DVD-RAM/RW/R disc or 396 for the HDD.
• One continuous recording cannot exceed in any case 9 hours. Recording automatically stops at 9 hours.
•You cannot start recording immediately before a programmed recording starts.
• During monaural sound recording, the same sound is recorded on both the left and right channels.
• When “Audio” is set to “L-PCM”, multi-channel sound is recorded as stereo sound. When playing this recorded sound, you
will hear NICAM Mode I and NICAM Mode II sounds simultaneously. Press the AUDIO button to select a desired sound.
•
When “DVD compatible mode” is set to “On (Mode I)” or “On (Mode II)”, the unit records the same sounds on both the left
and right channels when receiving monaural sound. When receiving the NICAM Mode I/Mode II sound, the selected sound,
Mode I or Mode II, is recorded on both the left and right channels
.
• Depending on the disc condition, pressing the REC button may take a longer time to start recording.
•
When a starting time of a programmed recording comes, a recording in execution is stopped and the programmed recording
starts. If you do not want to stop the recording, cancel the timer program before it starts
.
• Even if you set “Aspect ratio(video mode)” ( page 28) to “16:9”, images are recorded in 4:3 aspect ratio when using a
DVD-R or DVD-RW disc with “Pict.” set to “1.0” (Mbps) or “1.4” (Mbps).
RD-XS24SB_Ope_E_p037-041 8/31/05, 11:54 PM38