


38
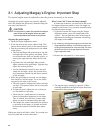
3.1 Adjusting Margay’s Engine: Important Step
The optical engine must be adjusted to aim the picture accurately at the screen.
Although the optical engine was perfectly adjusted
when the Margay left the factory, vibration along the
way may have moved it.
CAUTION
It is important to check this mechanical adjust-
ment of the optical engine before any elec-
tronic adjustments are made to the picture.
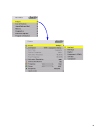
Aligning the optical engine
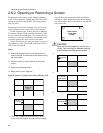
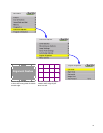
1. Open the Engine Alignment menu.
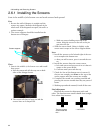
2. In the last item in the menu, choose Grid. This
pattern shows all the pixels in the optical engine.
3. Start by positioning the grid pattern to the
center
of the screen.
a. The Left and Right Side controls move the left
and right sides of the grid up and down. These
two controls react with one another a little, so
moving the right side may affect the left side,
too.
b. Separately the Left and Right Side controls
adjust rotation of the grid image. Together they
adjust the vertical position.
c. Use the Horizontal control to move the grid
image left and right. Again, this control inter-
acts somewhat with the up and down controls
of left and right.
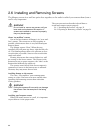
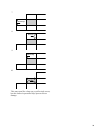
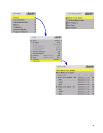
4. When the grid image is centered, use the Image
Size control to size the image. Try to lose (hide)
one pixel at the edge of the screen.
a. The other pattern, Alignment Dashes can help
you here. This pattern shows the last six pixels
at each edge.
b. To hide one pixel, adjust the size so that you
see five dashes at each edge.
c. There may be a small amount of curvature
(barrel or pincushion distortion) at the edges.
This is normal. You will have no more than
about one pixel of curvature along any edge.
d. The Image Size control may affect the rotation
or position of the image, so go back and forth
between the controls to find the best adjust-
ment.
Hiding one pixel at all sides is ideal. Try to make it at
least one pixel and no more than three.
What if you CAN’T move the image enough?
In some rare situations, you may not be able to use
the Engine Alignment menu to move the image far
enough on the screen. If so, you must manually move
the optical engine carriage.
1. If you have moved the image using the Engine
Alignment menu, move the image back to the
“center”. You can find the center of the range of
alignments by finding each extreme and moving
the image to the middle.
By “centering” the alignment engine you will retain fine
image adjustment settings. In the following steps, you
will do gross adjustments to move the image. You must
still do fine tuning of the image alignment using the
Engine Alignment menu.
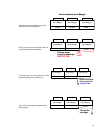
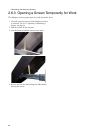
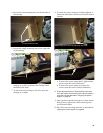
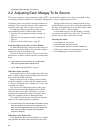
2. Remove the rear panel (6 ¼-turn screws).
3. The optical engine carriage is exposed. (Cables
normally attached to the optical engine have been
removed for these pictures.)