


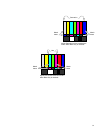
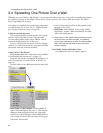


3.4 Spreading One Picture Over a Wall
54
3.4 Spreading One Picture Over a Wall
Whether you use Clarity’s Big Picture™ or an external video processor, your goal is to make the picture
fit together properly at the edges. When this is done correctly, the viewer does not notice the black
lines separating the screens.
If you have not checked the optical engine alignment
on each Margay, do so now. (See 3.1 “Adjusting Mar-
gay’s Engine: Important Step” on page 38.)
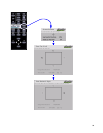
Using an external processor
The processor divides a single picture into several
sections and sends each part on a separate cable.
Connect these cables to the proper Margay. You do
not need the Big Picture key is this case.
You can still position the picture with the Margay
controls, or, with most processors, position and zoom
the picture with the processor controls.
Using Clarity’s Big Picture™
Each Margay must have a Big Picture key installed
(“Installing the Big Picture Key” on page 12).
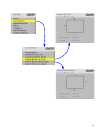
Loop the same source through all the Margays in a
wall (“Connections, Control: RS232 & RS485” on
page 28).
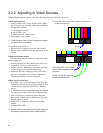
For each cube, set the Wall menu for the same wall
size.
• Wall Width and Wall Height are the number of
cubes wide and high for the picture. This may be
different from the physical wall size. You could
build a 4x4 wall of Margays and use Wall Mode to
put a single picture on the four cubes in the upper
left corner, for instance.
• Unit Column and Unit Row is the position of the
Margay in this “wall.”
• Wall Mode, when checked, turns on the Clarity
Big Picture™ feature. When not checked, the cube
shows the whole picture.
Each cube in a “wall” gets the whole picture by looping
the source from one cube to another, or be feeding
them all with a distribution amplifier. The Wall & Aspect
Ratio menu tells the cube what portion of the entire
picture to display.
Scale Mode, Justify and Border Color…
…are explained in the next section, page 56.