


Maintenance & Fault Finding 3098 Technical Manual
5-6
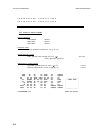
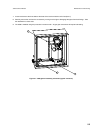
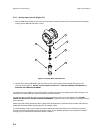
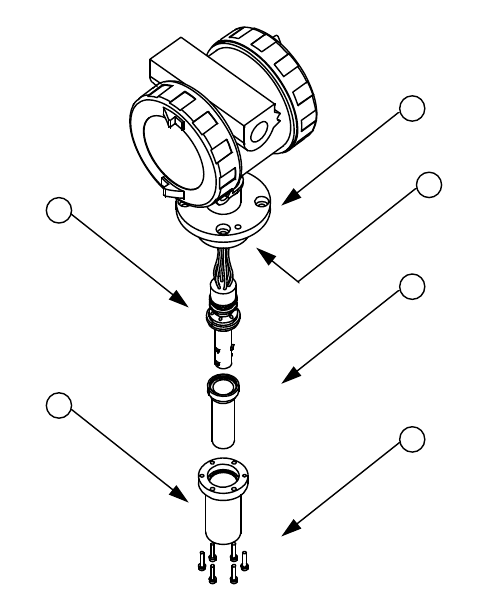
5.2.2 Density meter removal (Figure 5-2)
1. With the 3098 disconnected and removed from its enclosure, the density meter can be removed from the top plate by
undoing the four M6 bolts that hold it in place.
1
2
5
3
4
6
Figure 5-2: Density Meter exploded view
2. Use two of the removed M6 bolts to jack the meter from its housing using the two threaded holes found in the
mounting housing (item 6). DO NOT TRY TO LEVER THE UNIT OUT - THIS WILL DAMAGE THE SEALING ‘O’
RING AND THE VIBRATING ELEMENT.
The aperture left in the 3098 by this removal should be covered to stop dust or dirt getting into the meter chamber. The
meter itself can now be taken to a clean environment to be serviced further.
The density meter is refitted by locating it in the top plate and lowering it until it sits on the sealing O-ring. DO NOT
FORCE THE METER IN PLACE BY PUSHING DOWNWARDS. Tighten the four bolts in sequence to gradually ease the
meter into place.
Note that the bolts holding the density meter in place should be tightened to a maximum torque of 10Nm and should be
treated with proprietary thread locking compound, for example, Loctite.
The meter amplifier housing can be easily removed by releasing the clamp that holds it to the meter body (mounting
housing) and undoing the spoolbody wire connections inside. A more detailed description of the electronics inside the
housing is given in the Electrical Connections section, Chapter 3.