


Chapter 4
Removing and Replacing Components
Removing and Replacing the Power Distribution Board
101
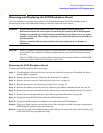
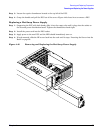
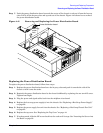
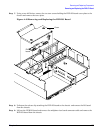
Step 7. Push the power distribution board towards the center of the chassis to release it from the keyway
slots. Pull it off the keyway slots and up and out of the chassis. Figure 4-41 shows how to remove
the power distribution board.
Figure 4-41 Removing and Replacing the Power Distribution Board
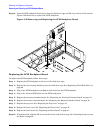
Replacing the Power Distribution Board
To replace the power distribution board, follow these steps:
Step 1. Replace the power distribution board over the keyway slots and push it towards the side of the
chassis to lock it onto the studs.
Step 2. Reattach the power distribution board to the chassis bulkhead by replacing the one torx #15 screw.
Tighten hand-tight.
Step 3. Plug the power and signal cables back into the midplane riser board.
Step 4. Replace the hot-swap power supply(s) into the chassis. See “Replacing a Hot-Swap Power Supply”
on page 99.
Step 5. Replace the power supply fan unit into the chassis. See “Replacing a Hot-Swap Chassis Fan Unit”
on page 65.
Step 6. Replace the top cover. See “Replacing the Top Cover” on page 44.
Step 7. If rack mounted, slide the HP server back into the rack until it stops. See “Inserting the Server into
the Rack” on page 39.
Power distribution board
Attaching
screw
hole