


Chapter 4
Removing and Replacing Components
Removing and Replacing Server Memory DIMMs
47
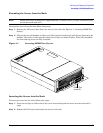
NOTE If desired, the processor extender board may be removed without removing the HP
server from the rack.
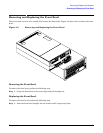
Step 2. Remove the front bezel. See “Removing the Front Bezel” on page 41.
Step 3. Remove the front cover. See “Removing the Front Cover” on page 42.
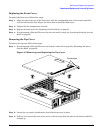
Step 4. Remove the memory extender board. See “Removing the Memory Extender Board” on page 44.
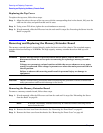
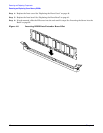
Step 5. Identify the DIMM to be removed and push the appropriate extraction levers found on either side of
the DIMM slot outward to the open position. The DIMM ejects from the slot.
Step 6. Remove the DIMM from the socket.
Installing Memory DIMMs
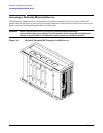
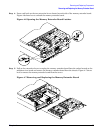
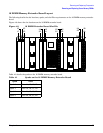
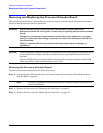
Your HP Integrity rx4640 comes with a 16 DIMM memory extender board that is minimally configured with
1GB of memory (four 256 Mb DIMMs loaded in quad 0 [slots 0A, 0B, 0C, and 0D]). See Figure 4-9 for the slot
locations on the 16 DIMM memory extender board.
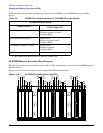
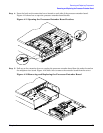
An optional 32 DIMM memory extender board is available to replace the 16 DIMM memory extender board
and must also be minimally configured with 1 GB in quad 0. See Figure 4-10 for the slot locations on the 32
DIMM memory extender board.
You may insert additional DIMMs into both 16 and 32 DIMM boards. When adding DIMMs, you must use a
minimum of four like sized DIMMs in the next available quad. DIMMs must be loaded in quads with qualified
modules. Memory is protected by data ECC, and the hardware implementation supports chip-spare.
Supported DIMM Sizes
Supported DIMM sizes are 256 MB, 512 MB, 1 GB, 2 GB, or 4 GB. Dissimilar DIMM sizes may be used across
the entire extender board but all four DIMMs in each quad must match. For cooling purposes, DIMM fillers
must be used in some unused slots.
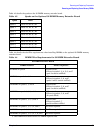
DIMM Slot Fillers
Both the 16 and 32 DIMM extender boards have DIMM slot filler boards placed over all unfilled DIMM slots.
As you fill DIMM quads with additional memory you must remove the DIMM slot fillers covering the affected
slots. All remaining DIMM fillers in unused slots must remain in place to maximize internal cooling. See
Table 4-2 and Table 4-4 for slot filler requirements for the 16 and 32 DIMM memory extender boards.
NOTE One DIMM filler board covers two adjacent DIMM slots. As a general rule, only remove DIMM
slot fillers as you add memory and the correct configuration will always remain.
Installing DIMMs
To install DIMMs, follow these steps:
Step 1. Align the DIMM with the socket located on the memory extender board.
Step 2. Gently and evenly push on each side of the DIMM until it seats in the socket. Ensure that the
extraction levers are in the closed position. Repeat as needed until all additional DIMMs are
installed.
Step 3. Replace the memory extender board. See “Replacing the Memory Extender Board” on page 46.