


23
Connection and setup
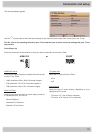
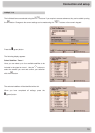
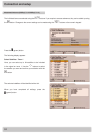
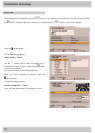
LNB frequency (MHz):
You only need to specify this data if your LNB type is not “Universal LNB”. The data required differ for the settings
“Simple” and “User-dened”. Refer to the documentation supplied for your LNB.
- Selection “Simple” LNB: Use the numeric keypad to enter the LNB frequency
- Selection “User-defined”: Press the
button to input the required low, high and limit frequencies as necessary.
The input is performed using the numeric keypad
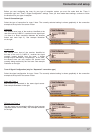
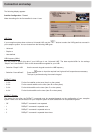
Uncommitted Switch
Set the “Uncommitted Switches” here to match the conguration of your reception system. You can select “Off” or a value
between “1” and “16” in single unit increments.
DiSEqC™ Repeat:
The setting for how often the DiSEqC™ command must be repeated depends on the conguration of your reception
system. Refer to the documentation for your reception system or seek assistance from a specialist engineer.
- Off DiSEqC™ command is not repeated
- 1 DiSEqC™ command is repeated once
- 2 DiSEqC™ command is repeated twice or
- 3 DiSEqC™ command is repeated three times
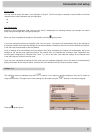
SatPos
Select the eld “Position”. Set the “Position” here to match the conguration of your reception system. You can choose
between: “Off” or a value between “1” and “4” in single unit increments.
Test-Transponder:
Select the “Test-Transponder” eld. Here you can select a transponder for checking whether your settings are correct
using the signal strength bar and signal quality bar.
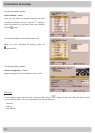
When you have completed all settings for this satellite, press the
(green) button.
If you have selected more than one satellite (max. 64) for tuner 1, the receiver will automatically skip to the settings for the
second satellite. Now make the settings for the second satellite, followed by the other selected satellites, in the same way
as described for the rst satellite.
Once all settings for all the satellites that you selected have been completed, the receiver will automatically skip to the
settings for the second tuner (assuming that for the second tuner you selected the connection type “Separated” and
set the signal conguration to “Different from Tuner 1”). If this is the case, now make the settings for the second tuner
in the same way as you did for the rst tuner.
Once you have completed the settings for both tuners and the satellites assigned to them, the receiver will automatically
display the screen for the channel search. Continue the rst installation with the “Channel search” chapter.