


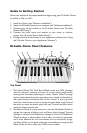
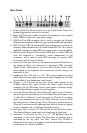

3. Data Entry Slider:This slide controller allows you to adjust the value of
parameters such as Volume, Velocity, Aftertouch, and virtually any
assignable MIDI control parameter directly from your keyboard.Making
settings with the data slider is covered in the “Utilizing the
Programming Keys” section of this manual.
4. MIDI/SELECT Button: Use this button to select different MIDI
commands using certain keys from your keyboard.Activation of this key
is indicated by a lit LED on the MIDI/Select Button. When
MIDI/SELECT is activated,the keyboard becomes a set of function keys
for setting MIDI parameter commands.
5. Octave Up & Down / Preset buttons: Pressing these buttons during
normal use will allow you to select the octave orientation of the
M-Audio Ozone’s keyboard. Following a pressing of the MIDI/SELECT
button, they alternately allow you to select the preset-bank setting
(P1-P5) of the M-Audio Ozone’s keyboard. Pressing the MIDI/SELECT
button again, after a preset-bank selection,will return these buttons to
their normal octave-select function.
6. Rotary Controller Knobs:These eight programmable rotary knobs can
be used to send any MIDI controller data on any MIDI channel.This is
perfect for use with hardware and software synthesizers, for
automating software mixers, or for controlling any devices that will
respond to MIDI commands. In the “Programming Assignment Keys”
section, the “Set CNTRL Key” instructions will show you how to
program this special feature.
7. Mic/Inst. Gain:These knobs control the preamp gain of the Mic In (Ch
1) and Instrument In (Ch 2).This level is sent to the USB output for
computer recording, and also to the M-Audio Ozone Output 1 & 2
when the Direct Monitor level controls are used.
8. Signal and Clip Indicators:These indicators show the output level of the signal
coming from the Mic and Instrument Ins. For more information on setting
these controls,see the section of this manual titled,“Setting Input Gain.”
9. Direct Monitor Level Knobs:These knobs set the monitor level of the Mic
In (Ch 1) and Instrument In (Ch 2) preamp signals before they are sent to
the computer.These listening levels can then be heard at Outputs 1 & 2,
and also at the Headphone Out.When the Aux Input “Record/Monitor”
switch is set to Record,these Direct Monitor Level controls then control
the monitor level for the Aux Input signal. For more information, see the
section of this manual titled,“Using Direct Monitor.”
10. Headphone Level:This control sets the level of the audio going to the
headphone output.
11. Phantom Power Indicator:This light indicates that 48V phantom power
is being sent to the Mic In (Ch 1). Phantom Power is turned on and off
by the Phantom Power switch on the M-Audio Ozone’s rear panel.
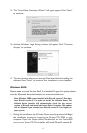
12. Key Programming Assignments: After pressing the MIDI/SELECT
Button, the keys on the M-Audio Ozone become function keys that
allow you to assign particular MIDI parameters as well as Program
Change and MIDI Channel selections using the numbered key group.
6