


22
••••••••••••••••••••••••••••••••••••••••••••••••••••••••••••••••••••••••••••••••••••••••••••••••••••••••••••••••••••••••••••••••••••••••••••
Basic Operations (continued)
25P
12.5P
8.333P
6.25P
5P
4.167P
3.125P
2.5P
1P
0.5P
0.25P
0.125P
25P
12.5P
8.333P
6.25P
5P
4.167P
3.125P
2.5P
1P
0.5P
0.25P
0.125P
12.5P
6.25P
4.167P
3.125P
2.5P
2.083P
1.563P
1.25P
0.5P
0.25P
0.125P
0.063P
12.5P
6.25P
4.167P
3.125P
2.5P
2.083P
1.563P
1.25P
0.5P
0.25P
0.125P
0.063P
8.33P
4.165P
2.777P
2.083P
1.666P
1.388P
1.041P
0.833P
0.333P
0.167P
0.083P
0.042P
8.33P
4.165P
2.777P
2.083P
1.666P
1.388P
1.041P
0.833P
0.333P
0.167P
0.083P
0.042P
6.25P
3.125P
2.083P
1.563P
1.25P
1.042P
0.781P
0.625P
0.25P
0.125P
0.063P
0.031P
6.25P
3.125P
2.083P
1.563P
1.25P
1.042P
0.781P
0.625P
0.25P
0.125P
0.063P
0.031P
5P
2.5P
1.667P
1.25P
1P
0.833P
0.625P
0.5P
0.2P
0.1P
0.05P
0.025P
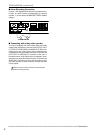
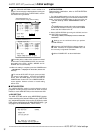
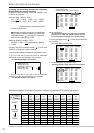
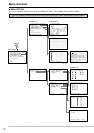
Number of
operational
cameras
PPS
SHORT
Recording
interval
LONG
# 1 # 2 # 3 # 4 # 5 # 6 # 7 # 8 # 9
Relationship between the number of operational cameras and available “PPS” (pictures per second)
♦ Setting the recording interval and recording
picture quality for normal recording
To perform normal recording, “PPS” and “GRADE” must
be set for each camera.
Setting of “PPS” ( default : “2.5P” )
“5P”, “
2.5P”, “1.667P”, “1.25P”, “1P”, “0.833P”,
“0.625P”, “0.5P”, “0.2P”, “0.1P”, “0.05P”, “0.025P”,
“- - - - - -”
“- - - - - -” : Recording cannot be performed with
camera set to this item.
Available recording intervals will vary according
to the number of cameras operating or ALARM RE-
CORDING settings (
see page 41). Interval dis-
plays will be according to the chart.
Setting of “GRADE” ( default : “STD” )
“SUPER”, “HIGH”, “
STD”(STANDARD), “BASIC”,
“LONG”
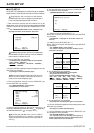
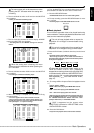
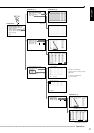
Example : Set “PPS” of camera number “
1
” to “0.5P” and
“GRADE” to “HIGH” for normal recording.
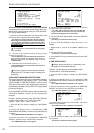
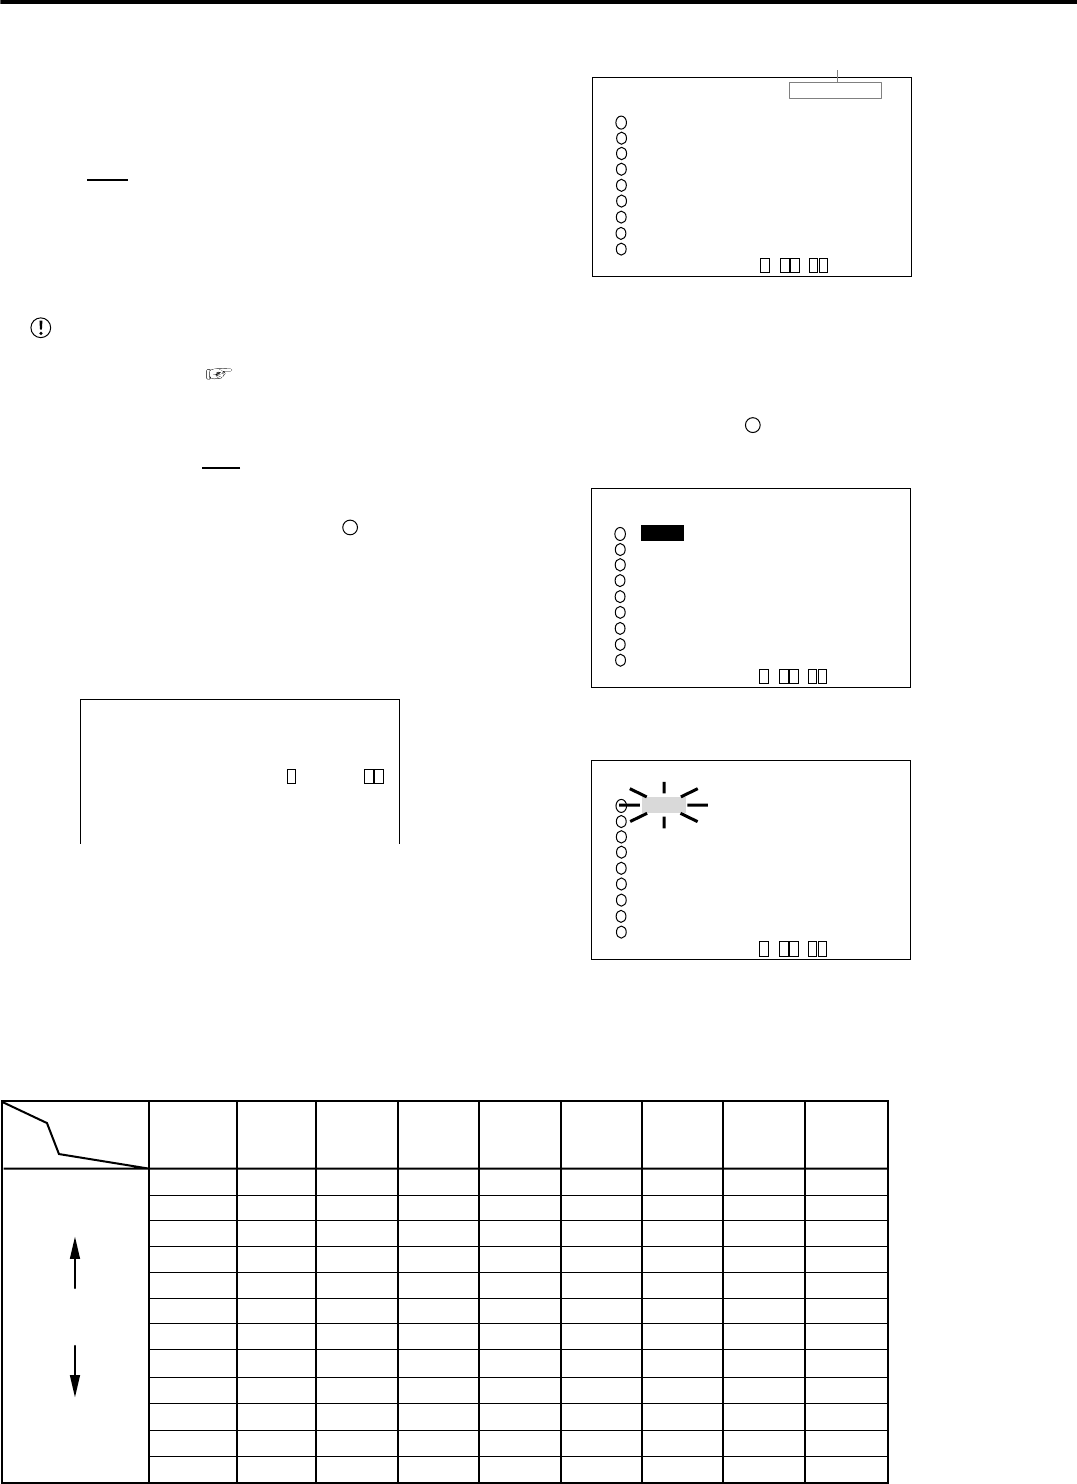
1. Press the SET UP button to display the <SETTINGS> screen.
2. Turn the JOG dial to move the cursor to “RECORD
SETTINGS” and turn the SHUTTLE ring clockwise.
• The <RECORD SETTINGS> screen appears.
<RECORD SETTINGS>
>>
ALARM SETTING
RECORD SETTING
ALARM REC DURATION 5S
PRE ALARM REC ( S ) S
MOTION DET REC ALARM
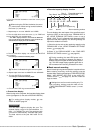
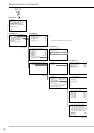
3. Turn the JOG dial to move the cursor to “RECORD
SETTING” and then turn the SHUTTLE ring clockwise.
• The <RECORD SETTING> screen appears.
<RECORD SETTING>
>>
ALARM CH
NO PPS GRADE A-PPS A-GRADE
2.5P STD 2.5P STD
2.5P STD 2.5P STD
2.5P STD 2.5P STD
2.5P STD 2.5P STD
2.5P STD 2.5P STD
2.5P STD 2.5P STD
2.5P STD 2.5P STD
2.5P STD 2.5P STD
2.5P STD 2.5P STD
<ESTD REC> D H M
<RECORD SETTING>
Camera selection during alarm recording
9
7
4
5
6
1
2
3
8
About <ESTD REC>
• The estimated recordable time is displayed as <ESTD REC>
depending on the “PPS” and “GRADE” settings. (The time
will not change when changing the alarm recording settings.)
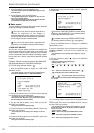
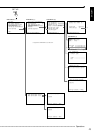
4. Turn the JOG dial to select “
1
” , and then turn the SHUTTLE
ring clockwise.
• The “PPS” setting reverses in color.
<RECORD SETTING> ALARM CH
NO PPS GRADE A-PPS A-GRADE
2.5P STD 2.5P STD
2.5P STD 2.5P STD
2.5P STD 2.5P STD
2.5P STD 2.5P STD
2.5P STD 2.5P STD
2.5P STD 2.5P STD
2.5P STD 2.5P STD
2.5P STD 2.5P STD
2.5P STD 2.5P STD
<ESTD REC> D H M
9
7
4
5
6
1
2
3
8
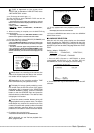
5. Turn the SHUTTLE ring clockwise again.
• The background of the “PPS” setting turns red and flashes.
<RECORD SETTING> ALARM CH
NO PPS GRADE A-PPS A-GRADE
2.5P STD 2.5P STD
2.5P STD 2.5P STD
2.5P STD 2.5P STD
2.5P STD 2.5P STD
2.5P STD 2.5P STD
2.5P STD 2.5P STD
2.5P STD 2.5P STD
2.5P STD 2.5P STD
2.5P STD 2.5P STD
<ESTD REC> D H M
9
7
4
5
6
1
2
3
8