


18
RQT9058
When copying begins, the VHS tape is played back starting at the tape’s
current position, and recorded to the disc.
[VHS] [RAM] [-R] [-R]DL] [-RW‹V›] [+R] [+R]DL] [+RW]
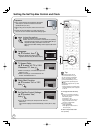
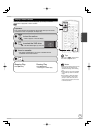
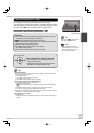
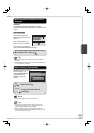
Copying Recordings (VHS DVD)
Preparation:
Turn on the television and select the appropriate video input to suit the
connections to this unit (example: AV input, etc.).
[RAM] If the disc is protected, release protection ( 47).
Insert a disc with enough space for recording.
Set the DVD recording mode (determined by program length and
available time on selected media 22).
Insert the VHS tape containing the program to be copied. Stop the tape
at the point where you want to start copying from.
Tips
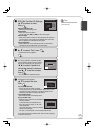
Additional navigation
You can begin the same kind of copy by using COPY Navigator. Use the operations listed
below instead of step 1 shown above.
1. Press [FUNCTIONS].
2. Press [, ] to select “Copy” then press [OK].
COPY Navigator screen appears.
3. Press [, ] to select “VHS to DVD” then press [OK].
Segmenting a recording to be copied
When copying from VHS to DVD, recordings on the DVD are divided according to index
signals detected on the tape.
− Recordings that are too short may not be divided correctly.
− The time it takes to record may become longer than the original recording depending on the
number of index signals.
To cancel copying in the middle
Press [ STOP].
− You can also press and hold [RETURN] for about 3 or more seconds to cancel copying in
the middle.
However, you cannot stop fi nalizing after it has started.
When copying multilingual broadcast program
[-R] [-R]DL] [-RW‹V›] [+R] [+R]DL] [+RW]
Before starting copy, try playing the VHS and pressing [AUDIO], and then select audio track
that you want to copy. Audio can also be switched during copy.
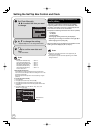
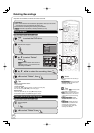
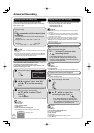
Copying Recordings
PLAY
to copy without fi nalizing.
− If you press [ STOP], you can cancel copying.
On the main unit
While both DVD and VHS are stopped
COPYING
COPYING
Press and hold for about
3 seconds.
REC
to copy and automatically fi nalize
when done
(see page 49 for more information on fi nalizing).
− If you press [ STOP], you can cancel copying.
− or −
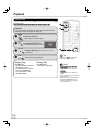
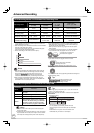
Notes
If copying doesn’t complete due to
shortage of remaining time, disc
space, or other reasons, fi nalizing
won’t start.
When copying doesn’t start, the
“COPYING” indicator on the main unit
blinks for about 7 seconds. Check if
the unit is properly prepared.
If a part of a tape recorded in VP
mode is copied to disc, noise may
appear at the beginning of the copied
part.
[-R] [-R]DL] [-RW‹V›] [+R] [+R]DL]
SLOW/SEARCH
S
C
H
E
D
U
L
E
OK
F
U
N
C
T
I
O
N
S
PAUSE
STOP
6
5
4
9
8
7
0
REC MODE
RETURN
SUB MENU
CM SKIP
CM SKIP
D
I
R
E
C
T
N
A
V
A
I
G
A
T
A
A
O
R
DISPLAY
AUDIO
REC
F Rec
STATUS
CHAPTER
CREATE
INPUT SELECT
CANCEL
DELETE
PLAY
A
B
SETUP
SKIP
/
INDE
X
REW
EW
W
W
FF
FF
FF
TIME SLIP
/
/
JET REW
RESET
2
2
COPYINGCOPYING
REC
REC MODEREC MODE
INPUT SELECTINPUT SELECT
COPYING indicator
− COPY will appear in the unit’s display when the copying process begins.
− Copying is automatically completed when the tape reaches its end or the
disc becomes full.
Tips
Icons such as “ [RAM] ” indicate
usable discs. Refer to pages 66
and 67.