


EnglishEnglish
28
Advanced Conguration
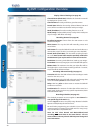
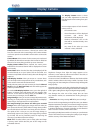
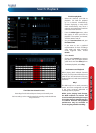
Display: Camera
Camera No.: Choose the camera / channel you want to edit
here. The Camera No is the same thing as the number written
on the rear panel next to the BNC socket used to connect the
camera.
Camera Name: Select a name for the camera you’ve selected.
By default, all channels are named as the Camera No. eld, but
this can be set to anything you’d like up to 16 characters.
Display Camera Name: When checked, the name you’ve
selected for the camera/channel will be displayed on-screen
as an overlay.
Record Date: When checked, the date (as displayed) will be
recorded directly on to your videos. This can be useful, as it
creates an inseparable record of exactly when the footage was
captured.
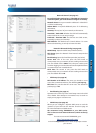
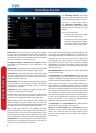
OSD Display Position: Gives you access to a screen where
you can easily set the exact positions of any overlaid text, such
as the camera name and the date and time.
Simply select any item you want to move (such as the Channel
Name and/or the Date and Time) and click and drag it to the
position you’d like it to be.
To exit the OSD Display Position screen, press the right click
button. A context menu will appear with two options: Save
and Exit. To exit without saving, simply choose Exit. If you
want to save your changes, choose Save rst.
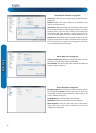
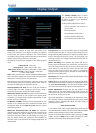
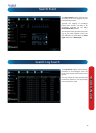
Image Settings: Gives you access to image adjustment tools,
allowing you to adjust the way the DVR interprets and displays
video images. See opposite for more information.
The Image Settings you choose will aect your recorded
footage. Rather than applying the changes after the video has
been processed (like many older DVRs) the Image Settings aect
how the DVR decodes the video it is receiving from the cameras.
The upside of this is that you can use the Image Settings to
dramatically improve the quality of the images being recorded
by the DVR. This can be particularly useful for improving the
accuracy of your Motion Detection settings.
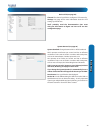
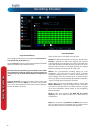
Mask: When checked, allows you to create, place and shape
a “privacy mask” which obscures part of the image on the
associated channel.
Brightness: Changes how light the image appears to be.
However, it can’t make the camera see further in the dark, or
increase the clarity of an ill-lit image.
Contrast: Increases the dierence between the blackest black
and the whitest white in the image. Useful if sections of the
image “grey out” but setting the contrast too high will degrade
image quality.
Saturation: Alters how much color is displayed in the image. The
higher the saturation, the more bright and vivid colors will appear
to be. Again, setting this too high can degrade image quality.
Hue: Changes the color mix of the image (this can have
very dramatic results). It’s somewhat like moving through a
rainbow.
Remember: Your image settings will aect your recordings!
You can use the Image Settings to help ne-tune your Motion
Detection sensitivity. At night, your camera’s images may seem
to icker slightly, or to have increased “noise”. In video, “noise”
is random uctuations of pixels, a little like an old television
that is not set to a station, often called “static”.
By tweaking the Brightness and the Contrast you can eliminate
much of this video noise, increasing the quality of your images
and the accuracy of the Motion Detection.
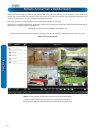
The Display: Camera menu is where
you can make adjustments to how the
DVR displays the feed coming from your
cameras.
You can adjust aspects of each channel/
camera, such as:
• the camera’s name
• what information will be displayed
on-screen, and where this
information will be displayed
• whether information such as the
date will be recorded directly onto
your videos
• any areas of the video you want
“masked” - that is, left blank