


English
55
Reference
Addendum: Third Party Hardware
Due to its nature as a networked device, the DVR is often
required to operate with third party hardware. We do
everything we can to ensure the DVR is compatible with as
many third party devices as possible; there will always be
some that require a little extra conguration.
Routers
I’m using a router which doesn’t support DHCP addressing.
or
Some devices on my network require STATIC addressing.
You’ll need to set the address of the DVR manually. You’ll need
to:
• Find Your Networks IP Address Range
• Create a Unique IP Address
• Assign the IP address information to the DVR.
Finding your Network’s IP Address Range
First, you’ll need to know the IP address, Subnet Mask and
DNS Server of at least one other device on your network. It’s
easiest to nd these addresses by using a computer on the
same network.
For Windows-based PCs:
• Open the Start Menu, navigate to Accessories and open
Command Prompt.
• Type “ipcong” and press Enter.
• Your IP Address information will be displayed.
For Mac-based systems:
• From the Apple menu, select System Preferences.
• Click on the Network pane.
• Click on the Advanced button and look under the TCP/IP,
DNS, and Ethernet tabs.
Creating a Unique IP Address
The IP Address of your computer will be made up of four
groups of numbers, separated by periods: aaa.bbb.ccc.ddd
The rst three groups of numbers (aaa.bbb.ccc) must be the
same as the other device on your network. The last number
(ddd) must be changed to something unique that nothing else
on your network uses.
For example:
If your computer’s IP address is 192.168.1.10, then a suitable
unique IP address for your DVR will be 192.168.1.210
Note: Each number in the IP address cannot exceed 255.
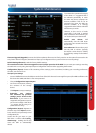
Assigning the IP Address information to the DVR.
We recommend doing this locally (on the DVR itself) even if you
can access the DVR via the network (using the MyDVR software)
in the meantime.
If you’re connected remotely and the networking information
changes, you might lose the connection to the DVR.
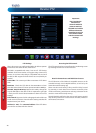
• Open the Network: General menu on your DVR (see
“Network: General” on page 37).
• Select Static addressing.
• IP Address: Enter the unique IP that you created for the
DVR here.
• Subnet Mask: Enter the same value as the computer’s
Subnet Mask.
• DNS Server: Enter the same value as the computer’s DNS.
The DVR should now be accessible via your local network.
Before you can access the DVR remotely, you’ll need to
Forward Ports (STATIC addressing does not support UPnP,
see below).
I’m using a router which doesn’t support UPnP. How do I
“forward ports”?
It depends on what type of router you have. There’s no
standard procedure for forwarding ports - each manufacturer
has their own user interface and procedure for customising
the behaviour of the router.
First, check the router’s documentation - the instructions may
be there.
If your router’s documentation doesn’t describe the method
for port forwarding, then open a web browser and navigate
to www.portforward.com - they’ve got instructions on port
forwarding for (literally) thousands of dierent routers.
We can’t oer much more information about forwarding ports
here, as this is a process totally dependent on third-party
hardware. If you do run into trouble, we suggest contacting
the manufacturer of the router.
Alternately, if you’re using an older router which doesn’t
support UPnP, then it might be time for an upgrade - modern
routers are increasingly powerful and are (in most cases) easier
than ever to setup. We think that UPnP is a fantastic feature
that’s well worth having, not just for DVRs.