


6 F 3 B 0 3 6 4
148
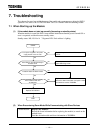
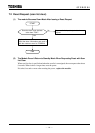
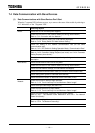
7.4 Data Communication with Slave Devices
(1) Data Communications with Slave Devices Don't Start
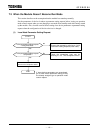
When the 7-segment LED indicates an error, try to remove the cause of the trouble by referring to
"6.2 Indications of the 7-Segment LED."
Checking objects
DN211 Check the T2/T2E/T2N side power-supplies.
Check the connection of the network cables (mis-wiring, disconnection).
Refer to "3.4 Connection with the Network."
Check the node address setting (for node address duplicated).
Refer to "3.2.2 Rotary Switch for Node Address Setting."
Check the setting of the network communication rate (for the same
communication rate).
Refer to "3.2.1 DIP Switch for Setting Operation Mode / Communication Rate."
Check the local node parameter setting and the scan list.
Refer to "4.6.3 Parameter Setting Request (local node)" and "4.6.4 Parameter
Setting Request (slave device)".
Check the slave devices for normal operation by referring to the slave device
description.
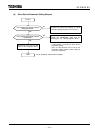
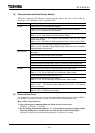
Slave device Check the slave device main unit for the power.
Check the connection of the network cables (mis-wiring, disconnection).
Check the node address settings (for node address overlapped).
Check the network communication rates (for the same communication rate).
Check setting items specific to individual slave devices.
Check the terminal resistor on both ends of the trunk cable (121Ω).
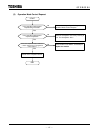
Network
Check the maximum network length specified.
Refer to "1.2.2 Trunk Line/Drop Line and Maximum Cable Length."
Check the drops cable length (less than 6 m).
Check the total extension of drops cables.
Refer to "1.2.2 Trunk Line/Drop Line and Maximum Cable Length."
Check the network power mechanism and the power capacity.
Refer to "3.5.1 The Network Power Mechanism" and "3.5.3 The Network
Power Unit (24vdc)."
Check the grounding of the network cables.
Refer to "3.5.4 The Network Grounding."