


Copyright © 2003 TOSHIBA CORPORATION. All rights reserved.
57
Chapter 7: Using the TV Guide On Screen interactive program guide
Direct tuning
To directly tune the TV to a program:
In the LISTINGS menu, select a program or a
broadcast-related panel ad or channel ad, and press
ENTER. The TV tunes itself to the selected program and
the TV Guide On Screen system closes.
• If you highlight a program in a future time slot, or a panel ad
or channel ad for a future program, the TV will tune to the
current program on the related channel.
• You can directly tune programs from other menus as well,
including the SORT and SCHEDULE menus.
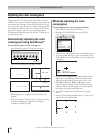
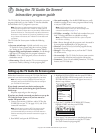
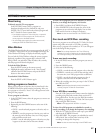
Video Window
The Video Window displays the current program for the ANT 1
or VIDEO 1 input source. As you surf through the listings, the
Video Window will change to display the selected program.
You can lock the Video Window to keep the current program
displayed, regardless of the program that is selected in the
listings. When you unlock the Video Window, the currently
selected program will then be displayed.
To lock the Video Window:
Press the SPLIT button on the remote control.
or... Highlight the station call letters in the “Last Channel”
column of the LISTINGS menu and press the BLUE
button on the remote control.
To unlock the Video Window:
Press the SPLIT or BLUE button again.
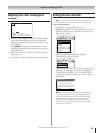
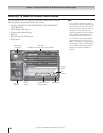
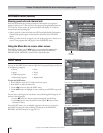
Setting programs as favorites
When you set programs as favorites, they are then listed in the
SCHEDULE menu for quick browsing and tuning. After you
set a program as a favorite, a “heart” icon will appear next to the
listing for that program.
To set a program as a favorite:
1. In the LISTINGS menu, select the program you want to set
as a favorite .
2. Press the BLUE button.
3. Repeatedly press the GREEN button to select one of the
following:
• ONCE—sets the selected program as a favorite only on
that day.
• WEEKLY—sets the program as a favorite every week on
the same day and at the same time, even if the program
titles are different each week.
• DAILY—sets the selected program as a favorite every day
it appears at the same time on the same channel.
To view a list of programs you set as favorites, to cancel a
favorite, or to change the frequency of a favorite:
1. Press MENU and select the SCHEDULE menu.
2. Select FAVORITES in the sub-menu bar. A list of the
programs you set as favorites will display. You can then
either cancel a favorite or change its frequency.
Note: You also can cancel favorites in the LISTINGS menu.
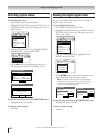
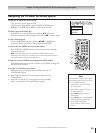
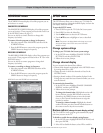
One-touch and VCR Plus+ recording
You can set programs to record from the TV Guide On Screen
system using either one-touch or VCR Plus+ recording.
After you set a program to be recorded, an “R” icon will appear
next to the listing for that program.
Note: Do not change channels on the TV or VCR during
recording. If you have a Cable box, do not change channels on
the TV during recording or the Cable box channel will change.
To use one-touch recording:
1. In the LISTINGS menu, select the program you want to
record.
2. Press the GREEN button.
3. Select one of the following:
• ONCE—records the selected program only on that day.
• WEEKLY—records every week on the same day and at
the same time, even if the program titles are different.
• DAILY—records the selected program every day it
appears at the same time on the same channel.
4. Before the recording start time, put a tape in the VCR and
turn OFF the VCR.
Note: Digital broadcast channels cannot be scheduled for
recording using the TV Guide On Screen feature.
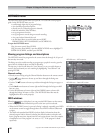
To use VCR Plus+ recording:
Press the VCR+ button on the remote control to schedule a
recording using PlusCode numbers from your local TV
listing publications. You also can view PlusCode numbers
by selecting a program in the TV Guide On Screen system
and pressing the INFO button.
Note: A VCR equipped with VCR Plus+ is required.
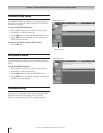
To view a list of all programs you scheduled to record, to
cancel a recording, or to change the frequency of a recording:
1. With the TV Guide On Screen system open, press MENU
and select the SCHEDULE menu.
2. Select RECORD. The programs you scheduled to record
will be listed. You can then either cancel any of the
recordings or change their frequency.
Note: You also can cancel recordings in the LISTINGS menu.
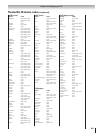
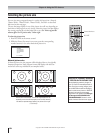
LISTINGS menu (continued)