


VXI Technology, Inc.
32 CT-400 Installation
OPTION 101 - VXIPLUG&PLAY RACK MOUNT KIT
This procedure provides the necessary instructions for installing a VXIplug&play rack mount kit.
Required Tools
1) #2 Phillips Screwdriver
2) T15 Torx screwdriver
Parts List
Item# Qty Description VTI P/N
1 8 Screw, 8-32 x 5/8" Button Head Torx, Black Steel 37-0130-062
2 1 Rack Mount Bracket, Plug&Play, Right Side 41-0223-000
3 1 Rack Mount Bracket, Plug&Play, Left Side 41-0223-001
4 4 Screw, 10-32 x 7/8", Flat Head Phillips, 82 Deg, Stainless 37-0147-087
Assembly Procedure
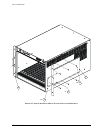
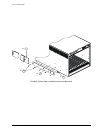
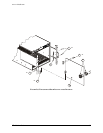
1) Lay the mainframe on a protected work surface on its long side with the voltage monitor
LEDs of the mainframe facing front with the power switch toward the top.
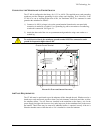
2) Locate the right and left side rack mount brackets. Install the rack mount brackets using eight
8-32 x 5/8" button head Torx screws. Refer to
Figure 2-4 for guidance. The VXIplug&play
mounting holes must be aligned where all three mounting holes are directly over the holes on
the vertical rails of the rack. In addition, the VXIplug&play mounting flanges should cover
exactly nine full EIA rack units.
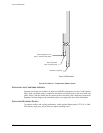
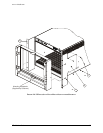
3) Once the rack mount kit has been installed, the mounting receptacle can be installed. Please
refer to the instructions provided with the mounting receptacle for assistance in its
installation. This hardware is not provided with Option 101. The 10-32 x 7/8" flat head
Phillips screws are provided for this purpose.