


VXI Technology, Inc.
38 CT-400 Installation
OPTION 103 - TRANSPARENT FRONT DOOR INSTALLATION PROCEDURE
This kit requires Option 100 be installed prior to its installation. Refer to the previous section on
Option 100 for installation instructions.
Required Tools
1) #2 Phillips Screwdriver
Parts List
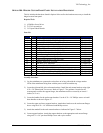
Item# Qty Description VTI P/N
1 2 Screw, 8-32 x 3/8" Phillips, Sq Cone Sems Zinc 37-0073-037
2 8 Screw, 8-32 x 3/8" Flat Head Phillips, Zinc 37-0080-037
3 1 Flush Pull Latch, 2.0" Dia., Black Polycarbonate 37-0118-000
4 2 Hinge, Nylon Lift Off, Offset Knuckle, Black 37-0131-000
5 1 Latch Bracket, Front Door 41-0225-000
6 1 Front Door, Transparent Bronze 41-0226-000
Assembly Procedure
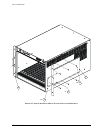
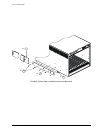
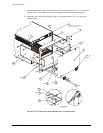
1) Lay the mainframe on a protected work surface on its long side with the voltage monitor
LEDs of the mainframe facing front with the power switch toward the top.
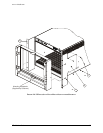
2) Locate the nylon hinges. Separate the hinges into its male and female components. Attach the
female component to the left rack mount flange using 8-32 x 3/8" flat head Phillips screws as
illustrated in
Figure 2-6. Note that the holes of the component are oriented in an upright
position.
3) Take the male components and attach them to the transparent bronze door using the 8-32 x
3/8" flat head Phillips screws provided. Use
Figure 2-6 for guidance in orienting this
component.
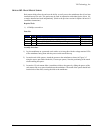
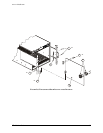
4) Locate the pull latch. Seat the latch mechanism into the door on the same side as the hinges.
Attach the cover of the latch using the screws provided with the latch.
5) Locate the latch bracket. Attach the bracket to the right rack mount flange using the Phillips
screws indicated on the opposing page.
6) Reconnect the male and female components of the hinge.