Making connections
9
DX-26L100A13
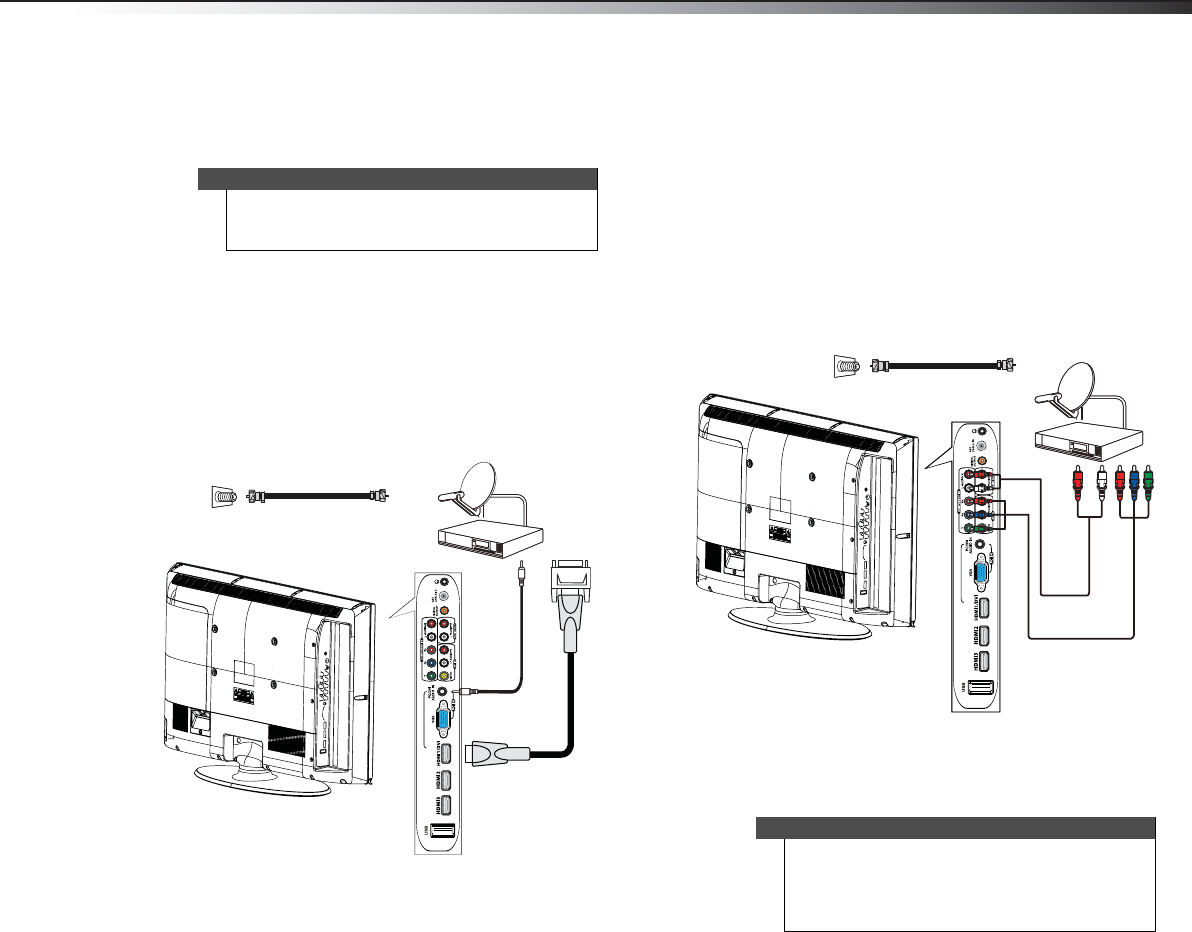
Using DVI (same as HDMI but requires an audio
connection)
To connect a cable or satellite box using DVI:
1 Turn off your TV and all connected equipment.
2 Connect the incoming cable from the cable wall jack
to the cable-in jack on the cable or satellite box.
3 Connect an HDMI-DVI adapter (not provided) to one
end of an HDMI cable (not provided), then connect it
to the DVI OUT jack on the cable or satellite box.
4 Connect the other end of the HDMI cable to the
HDMI1 jack on the side of your TV.
5 Connect a 3.5 mm audio cable (not provided) to the
PC/DVI AUDIO IN jack on the back of your TV and to
the AUDIO OUT jack on the cable or satellite box.
6 Turn on your TV, then turn on the cable or satellite
box.
Using component video (better)
To connect a cable or satellite box using component
video:
1 Turn off your TV and all connected equipment.
2 Connect the incoming cable from the cable wall jack
to the cable-in jack on the cable or satellite box.
3 Connect a component video cable (not provided) to
the COMPONENT IN/Y, PB, PR jacks on the side of
your TV and to the component video out jacks on
the cable or satellite box.
4 Connect an audio cable (provided) to the L and R
audio jacks on the side of your TV and to the audio
out jack on the cable or satellite TV box.
5 Turn on your TV, then turn on the cable or satellite
box.
Note
A DVI device must be connected to the HDMI1 jack.
If you connect a DVI device to another HDMI jack, you
will not hear any audio.
HDMI cable with
HDMI-DVI adapter
3.5 mm audio cable
Cable or satellite box
Side of TV
75 ohm coaxial cable
Note
When you connect the audio using the L and R audio
jacks, the audio output is analog. Your TV also has a
digital coaxial audio jack, so you can connect the
video to the component video jacks, then connect a
digital coaxial audio cable to receive digital audio.
Side of TV
Component video cable
Audio cable
Cable or satellite box
Cables are often
color-coded to match
color-coded jacks.
75 ohm coaxial cable
12-0204_DX-26L100A13 MAN_V1_EN.book Page 9 Monday, June 11, 2012 3:03 PM


