


Administrator’s Guide and Operating Instructions
51
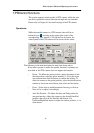
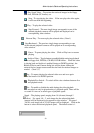
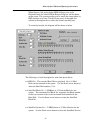
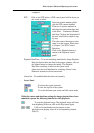
Slider Bar – Showing the current playing position in the selected
range. Click on it and drag the mouse to play the video from
anywhere in the selected range when it’s playing. The date and
time will be shown on the screen and the playback will be
temporarily stopped when you drag the slider.
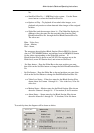
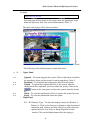
To change the playback video window to full screen, please click on
the video window, then select the appropriate option in the dialog
box shown. To return from the full screen playback, please click on
the full-screen video window, then follow the instructions in the
dialog box.
Note 1: The Reverse Play function is only effective for the HDD data which is recorded
after the system is upgraded to V2.1 (or later version). The image data recorded before
V2.1 cannot be reversed play even if the system has been upgraded to V2.1 or later
version.
Note 2: To archive the video images to CD-RW or DVD RAM, you must format the medium
on a PC at the beginning. Normally, the software “Nero Burning” and “In CD” come with
CD-RW or DVD RAM in the package, please install them in a normal PC, then you may
format the medium by “In CD”. To format the medium, insert the medium to the CD-RW
or DVD RAM and run the “In CD” software, follow the step as directed to complete the
formatting. As not all the CD-RW/DVD RAM is compatible with the system, please
contact your local distributor for the model list. If an IDE port CD-RW/DVD RAM device
is used, an USB-BOX will be required to connect the device to the system.
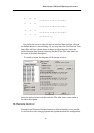
Note 3: For MPEG encoded picture, the retrieved images are saved as .MPG files, which are
playable in MS-Windows. For JPEG, the retrieved images are saved as .MOV files,
which are playable by QuickTime. You may download QuickTime at www.apple.com.
The filename of the retrieved file is cam##_YYYYMMDDHHmmSS(.MPG or .MOV):
##: Camera ID. (1-16)
YYYY: Year. (2001, 2002…)
MM: Month. (1-12)
DD: Date in month. (01-31)
HH: Hour. (0-23)
mm: Minute. (0-59)
SS: Second. (0-59)
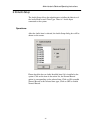
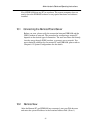
9.1 Select HDD & Range Dialog Box