


14
• Before starting adhesive work, note that the optimum processing temperature of materials to be
glued and the sealant is between +15 °C and +25 °C. Prepare all necessary fastening elements
and tools.
• Prepare the tube of adhesive sealant in accordance with the instructions enclosed with the tube.
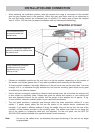
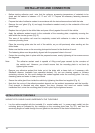
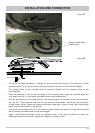
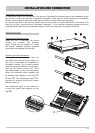
• Remove the roof gland (Fig. A) and apply the adhesive sealant evenly to the underside of the roof
gland fl ange.
Replace the roof gland in the drilled hole and press it fi rmly against the roof of the vehicle.
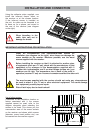
• Apply the adhesive sealant evenly to the underside of the mounting plate, completely covering the
area within the circular groove (Fig. D).
This area of the vehicle roof must be completely coated with adhesive in order to achieve the
necessary bonding force.
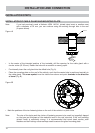
Place the mounting plate onto the roof of the vehicle, as you did previously when marking out the
drilled holes.
Make sure that the arrow on the mounting plate points forward in the direction of travel.
The fastening holes must be perfectly aligned with the prepared holes in the roof.
• Fasten the mounting plate in place with the prepared screws, evenly tightening all ten screws across
the diagonals.
Note: The adhesive sealant used is capable of fi lling small gaps caused by the curvature of
the vehicle roof. However, you should ensure that the mounting plate is not bent by
tightening the screws.
• Remove any adhesive sealant that leaks out at the sides with a clean cloth or if necessary with
Sikafl ex
®
remover (available from specialist dealers). Do not use cleaning agents or thinners
containing solvents, as this could damage the sealant applied under the mounting plate. Use only
cleansing paste and water to clean your hands.
• Secure the cable gland from inside the vehicle by tightening the ribbed nut supplied (Fig. A).
• Note that the curing of the adhesive sealant depends on the ambient temperature and the humidity.
Final strength is reached only after approx. fi ve days. However, this need not restrict further
installation work, since the mounting plate is held in place by the tightened screws.
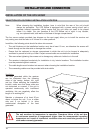
INSTALLATION AND CONNECTION
VARIANT WITH CABLE GLAND UNDERNEATH THE TURNTABLE
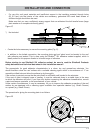
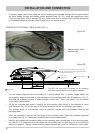
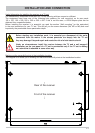
• Lay the cables supplied with the turntable (2 x coaxial cables and 1 x power supply cable) into the
mounting plate as indicated by the markings on the mounting plate (see Fig. E1), and feed the
remaining lengths of cable through the roof gland into the interior of the motor home/caravan.
INSTALLATION OF TURNTABLE