


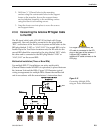
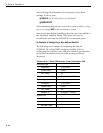


Based on this information, the data entered via the PC would
look like this, assuming that YOURSAT 101 would be Satellite 1:
SATCONFIG,USER1,7,W,3,L
@DEBUGON
@SATCONFIG,A,98,11966,27500,34,0x0800,H,H
@SATCONFIG,A,98,11823,27500,34,0x0800,V,H
@SATCONFIG,A,98,00000,27500,34,0x0000,V,L
@SATCONFIG,A,98,00000,27500,34,0x0000,H,L
@SAVE,A
@DEBUGOFF
ZAP
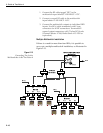
2.5 Checking Out the System
To complete the TracVision 4 installation, it will be necessary to
verify that the system functions properly. Critical to ensuring that
the system is configured and operating properly is to check the
system startup routine to ensure that the system is operating
within normal parameters.
1. Connect a PC to the maintenance port and startup
the system as instructed in Section 2.4, “Selecting
the Active Satellite.”
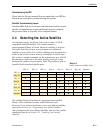
2. Allow the system to fully initialize. Review the
startup data and make sure that no system errors
have been reported. A representative startup
sequence has been provided in Appendix F.
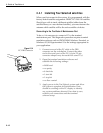
4. After completing the review of the startup and
operational routines, shut down the system.
Completing the Installation Process
1. Refer to your satellite programming guide. Select
several channels from your active satellite service
to confirm that the system is receiving and
decoding the signals properly.
2. Fill out and submit the warranty card to KVH.
2-17
Installation
54-0150 Rev. D