


24
RQTV0136
Timer Recording
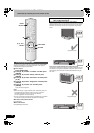
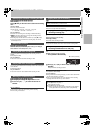
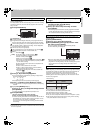
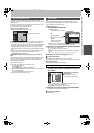
[1] Press [PROG/CHECK].
≥Make sure “New Timer Programme” is selected.
[2] Press [ENTER].
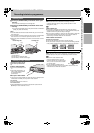
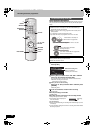
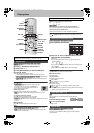
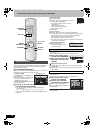
[3] Press [2, 1] to select the item then press [3, 4] to
change the settings.
≥You may use the numbered buttons to enter “Name”, “Date”, “Start”
and “Stop”.
≥Name (Programme Position/TV Station Name)
≥Date
You can also make a daily or weekly programme.
Each daily or weekly programme is counted as one programme.
≥Start (start time)/Stop (finish time)
The time increases or decreases in 30-minute intervals if you press
and hold the button.
≥Drive
You can select the DVD or VHS drive.
You can also press [DRIVE SELECT] to select the drive.
DVD,.VHS
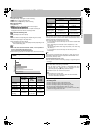
≥Mode (Recording mode)
[DVD]
XP,.SP,.LP,.EP,.FR (l 19)
^----------------------------------J
[VHS]
SP,.LP,.EP,.AUTO (l 19, 25)
^----------------------------J
You can also press [REC MODE] to change the recording mode.
≥Programme Name
Press [2, 1] to select “Programme Name” and press [ENTER]
(l 52).
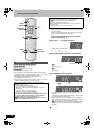
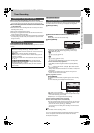
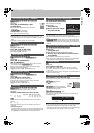
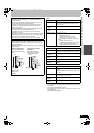
[4] Press [ENTER] when you have finished making
changes.
The settings are stored and the programme goes to timer recording
standby.
The timer recording icon is displayed in the left column.
≥“ ” lights on the unit’s display.
≥Make sure that the timer recording has been programmed correctly
on the timer recording screen (l 25).
≥“Invalid Entry” is displayed when you enter the wrong item.
Re-enter the item.
≥To continue programming:
Select “New Timer Programme” and repeat steps 2 to 4.
The timer recording standby mode is activated.
However, the unit may not turn off automatically.
≥If a timer recording starts while the unit is turned on, the unit will not
automatically turn off after the timer recording is complete.
To save
power turn the unit off by pressing
[Í, DVD/VHS].
You can turn the unit off during timer recording. This will not affect
the recording.
Note
Refer to “Notes on timer recording” l left.
Notes on timer recording
≥“ ” flashes when the unit cannot go to timer recording standby (non-
recordable disc or protected disc, etc.). Check the disc or video
cassette carefully.
≥When the disc or video cassette is removed, timer recording standby is
cancelled (the “ ” indicator goes out). You can put the unit back on
standby by inserting a recordable disc or video cassette (the “ ”
indicator comes on again).
≥If the unit is not put in the timer recording standby mode at least
10 minutes before the programmed timer recording starting time, the
“ ” indicator flashes on the unit’s display. In this case, insert a
recordable disc or video cassette to put the unit in the timer recording
standby mode.
≥When you set successive timer recordings to start immediately one
after the other, the unit cannot record the part at the beginning of the
later programmes (a few seconds when recording with DVD-RAM and
approximately 30 seconds when recording with DVD-R, DVD-R DL,
DVD-RW, +R, +R DL and +RW).
≥You can play or record on DVD, play or record on VHS even if the timer
recording standby mode is activated.
≥Timer recording can be started whether the unit is turned on or off.
≥When the timer recording starts while the unit is turned on, the unit will
not automatically turn off after the timer recording is complete.To save
power turn the unit off by pressing [Í, DVD/VHS].
You can turn the unit off during timer recording. This will not affect the
recording.
RETURN
A
P
R
O
G
/
C
H
E
C
K
ENTER
STOP
3
2
1
6
54
9
8
7
0
REC MODE
SUB MENU
DRIVE
SELECT
DVD/VHS
Í
DRIVE
SELECT
SUB MENU
∫
REC MODE
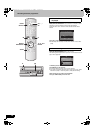
A
3, 4, 2, 1
ENTER
RETURN
PROG/CHECK
Numbered
buttons
Manual programming
Timer
Recording
DVD
VHS 17:50:32 5. 4. Wed
Remain 1:00 XP
:
New Timer Programme
01 8. 4. Sat 18:10 18:30 DVD XP OK
¢¢¢
04
Name
No. Date
Start
Drive
space
Stop Drive
Mode
“New Timer
Programme” is
selected.
Timer
Recording
DVD
VHS 17:50:32 5. 4. Wed
Remain 1:00 XP
:
ModeDrive
: :
StopStart
Name
Date
Programme Name
..
SP
Name
No. Date
Sta
Timer
Recording
DVD
VHS
Remain
New Time
01 8. 4. Sat 18:1
¢¢¢
04
RQTV0136.book 24 ページ 2006年4月19日 水曜日 午後1時28分