


Connecting up
02
19
En
English
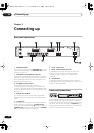
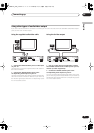
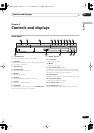
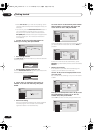
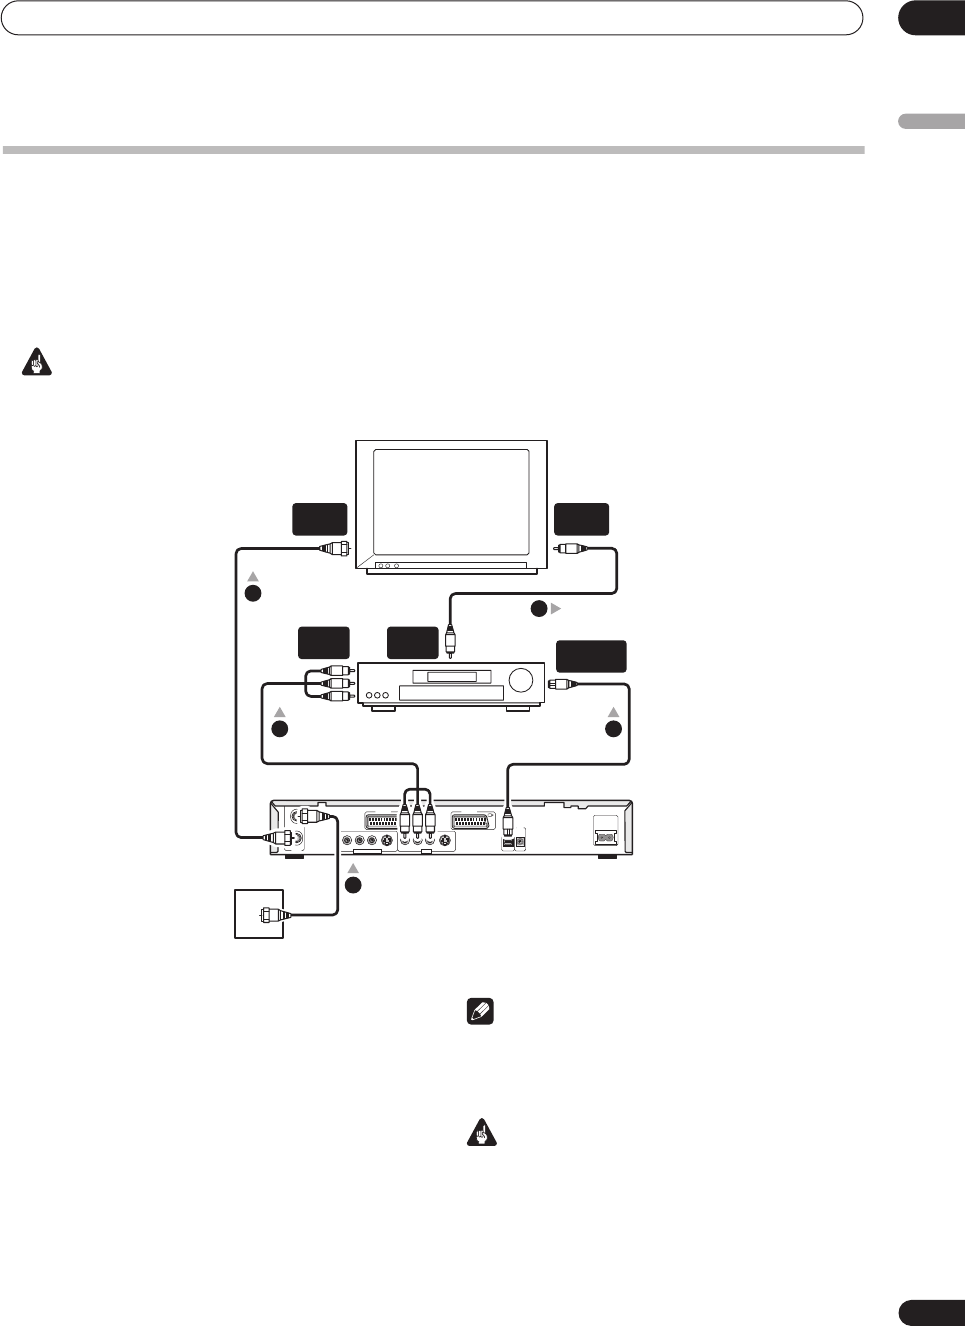
Connecting to an AV amplifier
To enjoy multichannel surround sound you need to connect this recorder to an AV amplifier/receiver using the digital
optical output.
In addition to a digital connection, we recommend also connecting using the stereo analog connection for
compatibility with all discs and sources.
You’ll probably also want to connect a video output to your AV amplifier/receiver. Use the ordinary video output (as
shown here), or the S-video output.
Important
• Noise may be output from your speakers if the recorder is not set up to work with your AV amplifier/receiver
properly (see
Audio Out settings
on page 101).
1 Connect RF antenna cables as shown.
This enables you to watch and record TV channels.
2 Connect one of the
DIGITAL OUT OPTICAL
jack on
this recorder to an optical digital input on your AV
receiver.
This enables you to listen to multichannel surround
sound.
3 Connect the analog AUDIO OUTPUT and VIDEO
OUTPUT jacks on this recorder to an analog audio
and video input on your AV receiver.
4 Connect the AV receiver’s video output to a
video input on your TV.
Note
• The diagram shows ordinary video connections,
but you can alternatively use an AV connector or
S-video connections, if they’re available.
Important
• Do not connect this recorder to your TV ‘through’
your VCR using A/V cables. Always connect it directly
to your TV.
TV
AV amp/
receiver
DIGITAL
OUT
AC IN
OPTICAL
CONTROL
IN
VHF/UHF
IN
OUT
AV 2/INPUT 1 AV 1(RGB)-TV
Antenna/cable TV
wall outlet
RL RL
AUDIO VIDEO
S-VIDEO
INPUT 3/AUTO START REC
AUDIO VIDEO
S-VIDEO
OUTPUT
ANTENNA
IN
VIDEO
IN
DIGITAL IN
OPTICAL
A/V
IN 1
VIDEO
OUT
1
3 2
1
4
DVR-03_HDD_EU.book 19 ページ 2003年9月16日 火曜日 午後12時23分