


Chapter 1 3
Connections & Setup
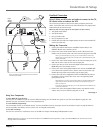
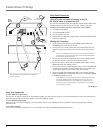
Excellent Connection
Using S-Video and A/V jacks and cables to connect to the TV,
RF coaxial cables to connect the VCR
This connection provides the best picture quality, surpassing that of A/V
cables. The S-Video cable, which carries video information only, requires that
audio cables also be used for sound.
What you will need (see page 6 for descriptions of these cables):
• Two (2) RF coaxial cables
• Two (2) A/V cables
• One (1) S-Video cable
• One (1) telephone line cord
• Coaxial cable lines fed from a digital satellite antenna and a standard TV
antenna (or cable line)
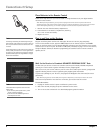
Making the Connection
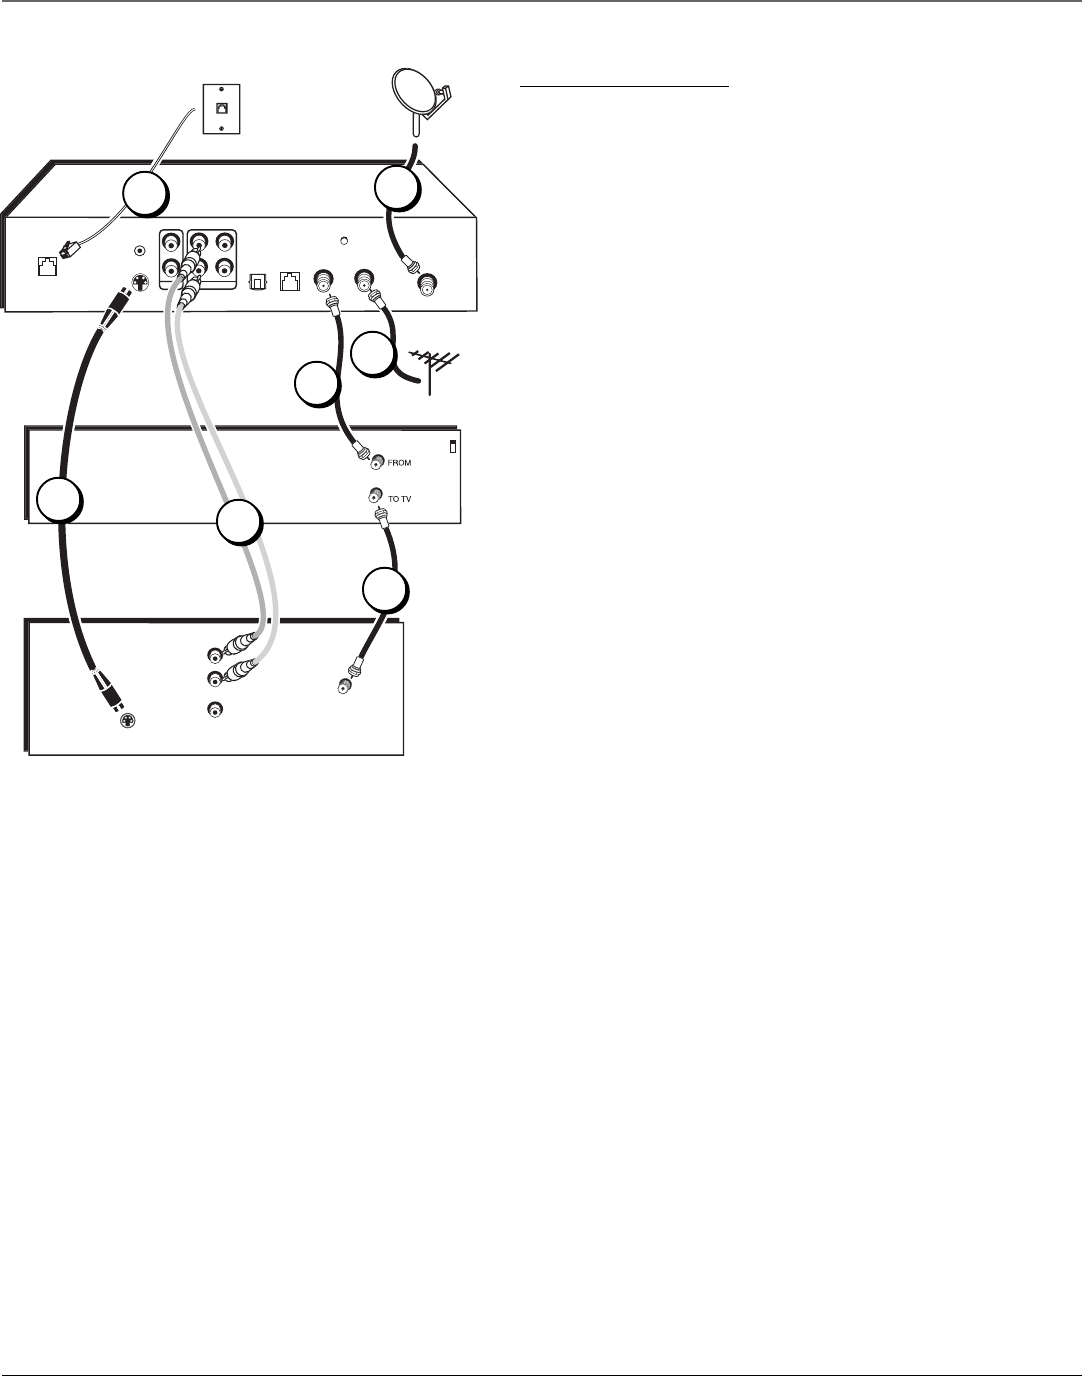
1. Connect the satellite dish antenna feed (RG-6 coaxial cable) to the
SATELLITE IN jack on the satellite receiver.
2. Connect one end of an RF coaxial cable to the OUT TO TV jack on the
satellite receiver, and the other end to the antenna input jack on the VCR.
Note: If your VCR has A/V input jacks, you can use A/V cables to connect the
satellite receiver’s second A/V jacks to the A/V jacks of the VCR instead of using
the RF coaxial cable.
3. Connect one end of an RF coaxial cable to the antenna output jack on the
VCR, and the other end to the TV’s antenna input jack.
4. Connect the cable or off-air antenna feed (RF coaxial cable) to the IN
FROM ANT jack on the satellite receiver.
5. Connect one end of the supplied telephone line cord to the PHONE JACK
on the back of the satellite receiver, and the other end to an RJ11-type
modular phone jack (the most common type of phone jack).
6. Connect two ends of the supplied A/V cables to AUDIO R and L jacks on
the satellite receiver, and the other ends to the corresponding audio
input jacks on the TV.
Note: Make sure you connect jacks by their labels. For example, AUDIO R on the
digital satellite receiver should be connected to TV’s right audio input jack, L
Audio to L Audio, etc.
If your TV only has one audio input jack, use the satellite receiver’s AUDIO L jack
to make the connection.
7. Connect one end of the supplied S-Video cable to the satellite receiver,
and the other end to the S-Video input jack on the TV.
Go to Page 6
Note: Your VCR and TV back panels may not look exactly
like the ones illustrated.
Di
g
ital
S
a
t
elli
t
e
R
ece
iv
er
Cable or
Off-air
Antenna
S
atellite
Di
s
h Ant
e
nn
a
R
J
11
mo
du
l
a
r
phone
j
ac
k
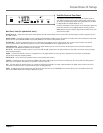
SATELLITE IN
S-VIDEO
OUT TO TV
IN FROM ANT
PHONE
GROUND
– R –
AUDIO
– L –
VIDEO
DIGITAL
AUDIO
VCR
LOW SPEED
DATA
TV
V
CR
IN
ANT
OU
T
VIDE
O
A
U
DI
O
L
R
C
H4
C
H
3
S
-VIDE
O
IN
FR
O
M
ANT
Using Your Components
To watch DIRECTV® programming:
Tune the TV to its S-Video line input (if you have difficulty finding your TV’s S-Video line input, see your TV’s User’s Manual or page 40 in this
manual). Then tune the satellite receiver to the desired channel.
To record DIRECTV programming:
Tune the satellite receiver to the desired channel. Then set your VCR to record on the proper input channel (video line input if using A/V cables to
connect the VCR to the satellite receiver, channel 3 or 4 if using RF coaxial cable).
To view VCR recordings:
Tune the TV to channel 3 or 4 (whichever is set on the VCR as its output channel). Begin VCR playback as usual.
1
2
3
4
5
6
7
DIRECTV programming is subject to the terms and conditions of the DIRECTV Customer Agreement; a copy is provided at DIRECTV.com and with your first bill.
See page 10 for more information.