


1-15
PFM-42B1, PFM-42B1E
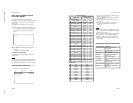
28
(GB)
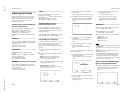
Using the Memory
Function
You can save the current picture setting for each input
signal using the MEMORY function. The saved
settings can be restored whenever necessary. The
items in the PIC CONTROL and PIC SIZE menus can
be memorized. You can save the picture settings of up
to twenty input signals. You can name the settings of
the items (up to 10 characters in length).
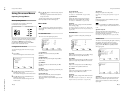
Storing the Current Setting
1
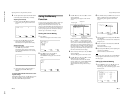
Press MENU.
The main menu appears on the monitor screen.
ENTER
MENU
MAIN MENU
INPUT SELECT
PIC CONTROL
PIC SIZE
CONFIG
MEMORY
REMOTE
STATUS
SELECT SET END
2
Press
v
/
V
to move the cursor (B) to
“MEMORY” and press ENTER.
The MEMORY menu appears on the monitor
screen.
ENTER
MENU
MEMORY
LOAD
SAVE
SELECT SET END
Adjusting the Pixels / Using the Memory Function
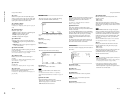
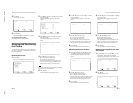
4
You can adjust the dot phase and the total number
of horizontal pixels automatically or manually.
Adjusting automatically
(1) Select AUTO with
v
/
V
and press ENTER.
The following menu appears on the monitor
screen.
ENTER
MENU
PIXEL ADJUST
AUTO : NO
SELECT SET END
(2) Select YES with
v
/
V
and press ENTER.
The dot phase and the total number of
horizontal pixels are adjusted automatically.
Adjusting manually
(1) Select DOT PHASE or TOTAL H PIXEL
with
v
/
V
and press ENTER.
The following menu appears on the monitor
screen. (The illustration below is for selecting
DOT PHASE.)
DOT PHASE : 50
(2) Adjust the dot phase or the total number of
horizontal pixels with
v
/
V
and press
ENTER.
To restore PIXEL ADJUST menu items to their
original settings
In the PIXEL ADJUST menu, press
v
/
V
to move the
cursor (B) to “RESET” and press ENTER. Then
select YES with
v
/
V
and press ENTER.
29
(GB)
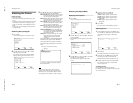
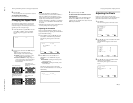
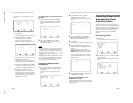
6
Press ENTER, then press
v
/
V
to move the cursor
(B) to “NAME SET” and press ENTER again.
The following menu appears on the monitor
screen.
ENTER
MENU
SAVE/No.01 [··········]
NAME SET:[ü VvbB·
fH
fV%. : ]
SELECT SET END
7
Select the character to be changed with
v
/
V
and
press ENTER.
The background of a character in the character list
changes to cyan.
8
Select a character in the character list with
v
/
V
and press ENTER.
The selected character is input.
9
Repeat steps 7 and 8 until you finish inputting the
name, then press MENU.
The menu returns to the SAVE menu.
Note
If the storing of the setting fails, the
“SAVE ERROR”
message appears on the monitor screen. Try to store
the setting again.
Calling Up a Stored Setting
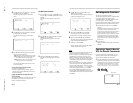
1
In the MEMORY menu, press
v
/
V
to move the
cursor (B) to “LOAD” and press ENTER.
The first page of the stored settings appears on the
monitor screen.
ENTER
MENU
LOAD/No.01 [··········]
-RGB/
fH
31.5
kHz
/fV59.9
Hz
/POL[N/N]-
CONTRAST : 80
BRIGHTNESS : 00
COLOR TEMP : HIGH
HSIZE : 00
HSHIFT : 00
VSIZE : 00
VSHIFT : 00
ASPECT : 4X3
ZOOM : X1
SELECT VERIFY END
Using the Memory Function
Character list
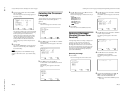
3
Press
v
/
V
to move the cursor (B) to “SAVE”
and press ENTER.
The following menu appears on the monitor
screen.
ENTER
MENU
SAVE/No.01 [··········]
-RGB/
fH
31.5
kHz
/fV59.9
Hz
/POL[N/N]-
SAVE EXECUTE
NAME SET
SELECT SET END
If there is no data in the selected memory number,
the “– – EMPTY – –” message appears on the
monitor screen in cyan. The signal type and the
color system or horizontal/vertical frequency are
displayed in cyan (showing that the signal type of
the selected memory number is the same as that of
the current setting) or in yellow (showing that the
signal type of the selected memory number is not
the same as that of the current setting).
4
Select a memory number (01 to 20) with
v
/
V
and press ENTER.
The cursor (B) appears on the monitor screen.
5
Press
v
/
V
to move the cursor (B) to “SAVE
EXECUTE” and press ENTER.
The current data is stored under the selected
memory number. The
“SAVE COMPLETED
”
message appears for about five seconds.
When you name the setting, follow the steps
below.
Signal type
Color system or horizontal/
vertical frequency
Memory number
Setting name