


3-28
PFM-42B1, PFM-42B1E
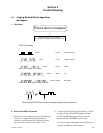
3-7-10. VA Adjustment
1. Open the load on VS and VA outputs, and set the load
on the other outputs to the minimum.
2. Apply 100 V AC.
3. Turn the STBY signal ON (short between CN7 pin-1
and pin-2), and also the VRR signal ON (short be-
tween CN4 pin-7 and CN7 pin-2).
4. Apply 0 V DC to the VRA (CN4 pin-5).
Use CN4 pin-6 as GND.
5. Adjust the RV602 so that the voltage of VA output
(between CN5 pin-5 and pin-1) is about 49 V.
6. Adjust the RV600 so that the voltage satisfies 49.2 V.
7. Adjust the RV602 so that the voltage satisfies 50 ± 0.1 V.
8. Apply 2 V DC to the VRA.
9. Check that the voltage satisfies 70 ± 0.3 V. If the
measured value is out of the range, repeat the above
steps from 4, where in step 6, shift the adjustment
value a little, then check the voltage.
Note : As the output voltage varies according to the voltage applied to the
VRA, do not shift the applied voltage (2 V DC).
3-7-11. VA OCP
1. Set the load on each output to the minimum.
2. Apply 100 V AC.
3. Turn the STBY signal ON (short between CN7 pin-1
and pin-2), and also the VRR signal ON (short be-
tween CN4 pin-7 and CN7 pin-2).
4. Apply 0 V DC to the VRA (CN4 pin-5).
Use CN4 pin-6 as GND.
5. Connect a voltmeter to the VA output (between CN5
pin-5 and pin-1).
6. Set the load on VA output to 4.4 A, and rotate the
RV601 until the output voltage varies.
Note : Be careful, not to turn excssively, because power can not be
obtained.
3-7-8. VS Adjustment
1. Open the load on VS and VA outputs, and set the load
on the other outputs to the minimum.
2. Apply 100 V AC.
3. Turn the STBY signal ON (short between CN7 pin-1
and pin-2), and also the VRR signal ON (short be-
tween CN4 pin-7 and CN7 pin-2).
4. Apply 0 V DC to the VRS (CN4 pin-3).
Use CN4 pin-4 as GND.
5. Adjust the RV402 so that the voltage of VS output
(between CN5 pin-2 and pin-6) is about 149 V.
6. Adjust the RV400 so that the voltage satisfies 149.2 V.
7. Adjust the RV402 so that the voltage satisfies 150 ± 0.1 V.
8. Apply 2 V DC to the VRS.
9. Check that the voltage satisfies 170 ± 0.3 V. If the
measured value is out of the range, repeat the above
steps from 4, where in step 6, shift the adjustment
value a little, then check the voltage.
3-7-9. VS OCP
1. Set the load on each output to the minimum.
2. Apply 100 V AC.
3. Turn the STBY signal ON (short between CN7 pin-1
and pin-2), and also the VRR signal ON (short be-
tween CN4 pin-7 and CN7 pin-2).
4. Apply 0 V DC to the VRS (CN4 pin-3).
Use CN4 pin-4 as GND.
5. Connect a voltmeter to the VS output (between CN5
pin-2 and pin-6).
6. Set the load on VS output to 3.8 A, and rotate the
RV401 until the output voltage varies.
Note : Be careful, not to turn excssively, because power can not be
obtained.