


Remember: After making changes to the settings press/click the APPLY button.
17
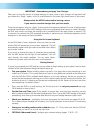
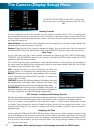
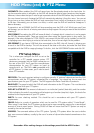
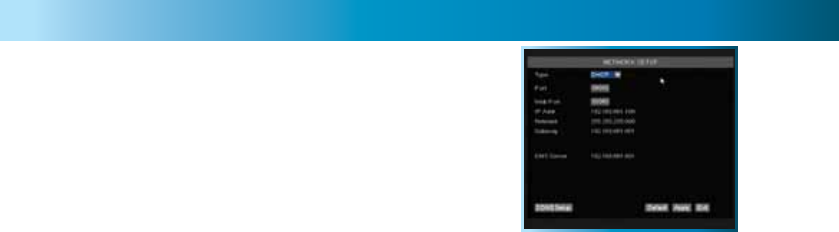
This is the NETWORK SETUP screen.
This is the most technically complex aspect to setting
up the DVR, and does require a working knowledge of
network technologies.
If you are unfamiliar with networking, then we suggest
talking with a professional - ideally, the same person who
installed your network, as they’ll know exactly how it’s
configured and how best to setup the DVR.
Configuring your DVR and your home network can be a tricky process - and these two pages are not
nearly long enough to cover it. See page 32 (and what follows) for more information.
TYPE: Here you can choose between the three different types of networks that the DVR can be
connected to. The three types of networks are:
DHCP (Dynamic Host Configuration Protocol) is a system where one device on your network (usually a
router) will automatically assign IP addresses to devices connected to the network.
STATIC networks require all devices need to have their IP addresses manually defined, as there is no
device dedicated to automatically assigning addresses.
PPPoE (Point to Point Protocol Over Ethernet) is an advanced protocol which allows the DVR to be
connected directly to a DSL line, without the need for a router or gateway. This is recommended for
advanced users only.
PORT: This is the port that the DVR will use to send information through. The most important things are that:
1. You’ll need to enable UPnP on your router (see page 32) so your router can selectively open these
ports, allowing the DVR to communicate via the Internet. If your router doesn’t support UPnP, you
have two options. You can either get a new router (which we’d actually recommend - UPnP is such
a good feature!) or you can manually forward ports from the router to the DVR. Port forwarding
is a technical and involved process, recommended only for the technically inclined.
2. Nothing else share this port. The default port number is 9000, which is not used by many other
devices/programs. However, particularly if you have another DVR or DVR-like device, something
might be using this port already. If this is the case, change this value to be unique.
WEB PORT: This is the port through which you will be able to communicate with the DVR. Like the
PORT, it will need to be forwarded properly in order to ensure smooth, latency-free communication. We
recommend changing this value to “85”, as this port is seldom used by other devices or applications.
IP ADDRESS: Just as houses and businesses need to have an address which identifies their location
on the road network, so too do computers and other devices need addresses (called IP ADDRESSES) to
identify their position on the electronic network. The DVR uses IPv4 addressing, which consists of four
groups of numbers between 0 and 255, separated by periods. For example, a typical IP address might
be “192.168.1.24” or something similar. The most important thing when setting the IP address is that
nothing else on your network shares that IP address.
SUBNET MASK: If the IP address is like a street address, then a subnetwork is like your neighborhood.
This will be formatted in a similar way to the IP address (ie. four numbers up to 255 separated by periods)
but contain very different numbers. In the above example, the Subnet Mask might be something like:
“255.255.255.0”.
GATEWAY: This is the address of the “way to the Internet” - to continue the road analogy, this is
like your local access point to the highway. This is an IP address in the same format as the others,
and is typically very similar to the IP address of the DVR. To continue the above examples, it might be
something such as: “192.168.1.254”.
DNS: “Domain Name System”. Everything on the Internet is located via an IP address - however,
for ease of use, we associate domain names (such as “www.exampledomainname.com”) with those
IP addresses. This index is accessible in many locations online, and we call those locations “DNS
servers”.
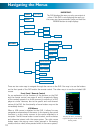
The Network Menu