114
Copyright © 2005 TOSHIBA CORPORATION. All rights reserved.
(E) 42/50HPX95 *web 213:276
Chapter 11: Using the THINC™ home network feature
F. Set up e-mail scheduling
You can remotely schedule and delete recordings and reminders
via e-mail to the TV from any PC.
Note:
• If you have not already done so, follow the instructions in
sections A and B , pages 108–110, before proceeding.
• Before you can schedule recordings, the time and date in the
TV Guide On Screen feature must be set. See “Setting the
time and date” on page 55.
Required information and services
Before you can set up the e-mail scheduling feature, you must
have the following information and related services:
a) A valid POP3 e-mail address dedicated for use by the TV
only.
b) A personal e-mail address (different from the TV’s
dedicated e-mail address) from which you can send e-mails
to the TV.
c) Login and password settings for the TV’s POP3 e-mail
account.
d) Name or IP address of the incoming (POP3) mail server.
e) Name or IP address of the outgoing (SMTP) mail server.
To obtain the required e-mail services listed above, contact
your ISP.
To obtain the required addresses and settings listed above,
either contact your ISP or use the configuration utility for
your DSL/cable modem or router.
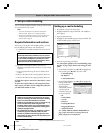
Setting up e-mail scheduling
1. Press MENU and open the Setup menu.
2. Highlight Installation and press ENTER. The Installation
menu appears.
3. Open the Network menu.
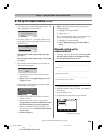
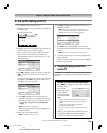
4. Highlight E-mail Scheduling Setup and press ENTER. The
E-mail Scheduling Setup window opens.
Done
E-mail Scheduling Setup
E-mail Scheduling
Please enter your E-mail Setup Information.
On
ID Required
Test cancel
Account
Password
Incoming Mail Server
Outgoing Mail Server
ID
E-mail Address
E-mail Authorization
Authorized E-mail
On
On
Enter YOUR E-mail here
XXXXXXXXXXXX
5. Enter the required data in the fields.
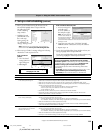
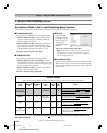
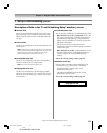
See “Description of fields in the E-mail Scheduling Setup
window” on page 116 for details on the settings for these
fields.
• For the fields listed below, press y or z to highlight the
field, and then press x or • to select On or Off:
– E-mail Scheduling
– ID Required
– E-mail Authorization
• For the fields listed below, press y or z to highlight the
field, press ENTER to
open the keyboard
window for the
selected field, and then
enter the required
information using the
on-screen keyboard:
–ID
– E-mail Address
–Account
–Password
–Incoming Mail Server
–Outgoing Mail Server
–Authorized E-mail
See “USING THE ON-SCREEN KEYBOARD” on
page 113 for instructions on entering data in the
fields using the on-screen keyboard.
Note: The e-mail address assigned to the TV must be a
dedicated POP3 address, different from your personal
e-mail address. Assigning your personal e-mail address
to the TV will eventually lead to the deletion of all of
your personal e-mails (including attachments). This is
NOT covered under the Toshiba warranty.
Note:
• Toshiba is not responsible for any damage or loss caused
directly or indirectly by the failure of the e-mail scheduling
feature to record content intended to be recorded.
• Toshiba is not responsible for, nor has any control over, any
content recorded and/or viewed using the e-mail
scheduling feature. Further, the e-mail scheduling feature
is not meant to be used for unauthorized recording and/or
viewing of copyrighted works.
• The unauthorized recording, use, distribution, or revision
of television programs, videotapes, DVDs, and other
materials is prohibited under the Copyright Laws of the
United States and other countries, and may subject you to
civil and criminal liability.
E-mail Address
Done Clear Cancel
123 54 67890-=
qwertyuiop[]
asdfghjkl;'
z
Shift BS
xcvbnm,./
XXXX@XXXXX.XX_
#01E_108-120_4250HPX95 05.9.12, 10:23 PM114
Black


