


18 19
CHAPTER 4 BASIC OPERATION
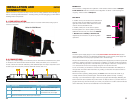
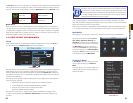
3.3 FRONT AND SIDE PANELS
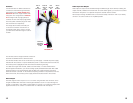
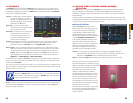
The front panel of the DVR has minimal features to aid in discretion. The most important item
is the Infrared sensor window. This should be kept unobstructed if the remote control is to be
used.
The two indicator lights show whether the DVR is currently recording and if it is powered up
and operating even if the screen is dark.
The side-mounted USB ports and Power Switch are covered in Section 2.2 but are shown
here for ease of reference.
BASIC OPERATION
CHAPTER 4
This chapter is intended to get your system operational in a baseline format now that you’ve
connected your system and turned it on. It combines information and instructions on several
submenus and settings but may not mention all of the functions or options available in a given
menu. For many users, these basic operating instructions may be all they need to operate
their security system. But, because this system offers many more features, later chapters will
cover those additional operations in greater detail.
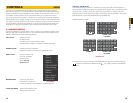
4.1 OPERATION
This DVR can be controlled through the USB mouse, the remote control or by using the
buttons on the right side of the device. For the purposes of this manual, instructions will be
given for using the mouse.
In operation, the mouse functions in the same manner as one would use a mouse attached
to a computer; point, click, right-click, and etcetera. In fields where data needs to be entered,
clicking on the field will bring up a virtual keyboard. (See Section 3.1 Mouse Control)
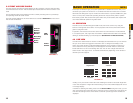
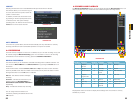
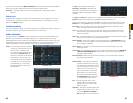
4.2 LIVE VIEW
Live View is the default mode for the DVR. It will display the video feeds from up to 8 cameras
and you do not need to be logged into the DVR to view or change the channel(s) on the
screen. The actual number of channels displayed depends on the number of cameras you
own as well as how many channels your model supports. Channels without a camera will
remain dark with a red “?” icon indicating video loss. You can view a single channel in full-
screen mode or four, eight, nine or 16 channels simultaneously depending on the number of
channels your DVR supports.
Single Screen 4 Screens
9 Screens
8 Screens
PICTURE 4-1
Clicking on any one screen in multi-view mode will bring that screen to full-screen single-view
mode. The exception is in eight-view where clicking on one of the smaller displays will move it
to the larger display.
In addition to selecting the viewing mode from the Shortcut Menu using the mouse, you can
also cycle through the modes using the up and down arrows on the remote or the side of the
DVR. The left and right arrows on the remote control will cycle through which channels are
displayed.
PICTURE 3-4
USB
Ports
Power
Switch
Infrared
Remote
Receiver
Window
Recording
Indicator
Power
Status
PICTURE 3-5