


26 27
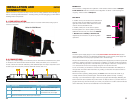
CHAPTER 4 BASIC OPERATION
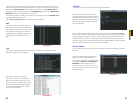
Zoom
In multi-screen playback, you may click on a channel to bring it to full-screen view. Double-
clicking the screen again will further enlarge the screen and remove the playback bar. Double-
clicking a third time will return you to the multi-screen mode. You can also step backwards in
the process by right-clicking.
PICTURE 4-14
PICTURE 4-15
PICTURE 4-16
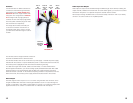
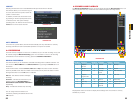
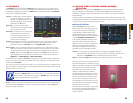
At any time, you can zoom into a recording
by clicking and dragging the mouse. This
will draw a green-outlined rectangle on
that screen and the cursor will change to
a magnifying glass. Click within the area
you’ve selected to zoom in, or click outside to
dismiss or re-select the area.
In the case of a multi-screen viewing mode, the zoomed in section will fill only that portion of
the screen occupied by that channel until you double-click on it at which time it will expand to
fit the screen. Double-clicking again will further enlarge the view and remove the playback bar
as above. Right-clicking the mouse will return you to your previous mode of viewing.
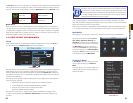
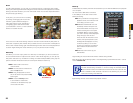
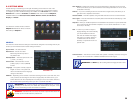
Video Clip
This allows you to save only a portion of a video clip. For example; if you have a camera set
to record all the time and it captures some action in a five-minute segment, you can clip only
that portion and back it up. In addition to making an incident readily available, saving only the
portion of interest will reduce the amount of disk space needed to back it up.
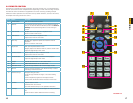
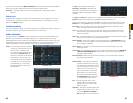
STEP 1. Select a file to view in the
normal manner.
STEP 2. Find the section of interest and
press the Clip button
STEP 3. Drag the playback bar to the
end of the section and press the Clip
button again.
STEP 4. Press the Backup button
to save the file to a USB drive
connected to the USB back-up port
on the side of the DVR.
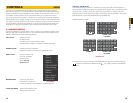
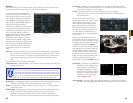
Back-up
Individual files recorded by the DVR can be backed up to an external USB device for playback
on a computer.
11:37:22 M
11:48:00 R
11:54:00 A
12:10:00 M
13:00:00 R
14:00:00 R
15:00:00 R
16:00:00 R
17:00:00 R
StartTime Type
1p 2p 3p 4p
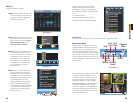
You must have a USB device connected
to the USB port on the side of the monitor
before proceeding.
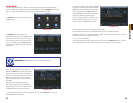
STEP 1. In your file list to the right of the
playback screen, check the box next
to the file(s) you wish to save.
STEP 2. Select the BACKUP icon and
the Backup window will open. Your
device will be listed at the top of the
window showing how much space
is available. Below it, the list of file(s)
you wish to back up will be displayed
along with type, start and end
times and size. At the bottom of the
window, the space required to save
the file(s) will be displayed. You may
uncheck any files you do not wish
to back up at this time. The Remove
button will remove all the files from
your list.
STEP 3. Press start to back up your
selected files.
Right-clicking the mouse will exit this window without saving the files.
More information about backing up files – including backing up the entire hard drive – can be
found in Section 4.9.
NOTE! The video files are in a proprietary format that will not play outside
the DVR without being converted to .avi format using the included General
Player software included on the Manuals and Software disc that came with this
DVR or available for free download at Q-See.com by searching for your model
number and looking under Software.
Right-clicking with the mouse will exit the playback window.