


46 47
CHAPTER 5 MENUS
PICTURE 5-26
PICTURE 5-27
5.4 ADVANCED
The settings in this menu cover user accounts, hard disk management, video display, and
system maintenance.
CAUTION! Reformatting the hard drive will erase all recorded events.
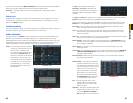
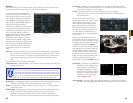
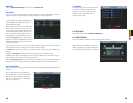
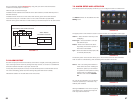
HDD MANAGE
This displays some of the same information found in the HDD Info window in the Info menu
(see Section 5.2) but this window allows you to make additional settings.
The drive name and status is displayed.
The status indicators are:
Clicking on Alarm Set opens the Abnormality window which is covered immediately
following this section.
Alarm Release – this turns off any disk alarm that may be occurring.
You can set the hard drive to four states:
O Drive is operating normally.
X Indicates an error
- Hard drive not installed
? Hard drive is damaged
Read/Write
Normal operation. The device records (writes) files to disk and plays (reads)
them.
Read Only No more files can be recorded onto the drive, but existing files can be viewed.
Format Reformats the hard drive.
Recover
If you are having problems with the hard drive, including corrupted files,
selecting Recover causes the drive to re-set, but does not erase its contents.
No changes will take place unless the Execute button is pressed once you’ve made your
selection. The drive’s status will be displayed next to the Type heading below the pull-downs.
If you make changes and press Execute, the DVR will restart once you press OK to exit. You
cannot right-click out of the menu.
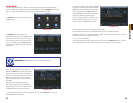
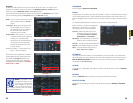
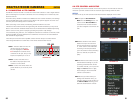
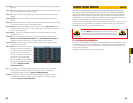
ABNORMALITY
This window allows you to set up alarms for disk and system disconnection errors as well as
how these alarms are handled. Each type of alarm can be independently enabled along with
what events that type of alarm will trigger.
Event type – Chose from No Disk, Disk Error,
Disk No Space, Net Disconnected
and IP Conflict.
Alarm Out – The alarm can be sent to up
to three external alarm devices
connected to the DVR
Latch – This is the “hold time” that the DVR
will wait before issuing another alarm.
The delay can be set to between 1 to
300 seconds (5 minutes).
Show Message – When enabled, this will
display the event notification on the
DVR’s screen.
PICTURE 5-28
PICTURE 5-29
Alarm Upload – This will send the alarm signal to a network, including an alarm monitoring
center.
Send E-mail – this will send an e-mail notification to the recipient address set up in the
Network menu (see Section 8.2 Advanced Network Setup).
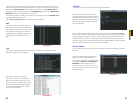
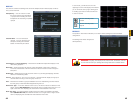
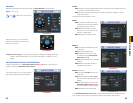
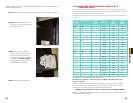
ALARM OUTPUT
Alarm configuration is covered in Chapter 7. This window allows you to quickly change the
operating mode of connected alarms – Schedule, Manual (on) or Stop (off) - as well as
showing the status of any connected alarms.
You can turn change the mode of the alarms
individually or all at once by clicking the circle
in the All column. In addition to activating
them to operate based according to their
schedule, you can turn them on or off. This
will override the scheduling set up in Section
7.3 and elsewhere.
If alarms are properly connected, the
Status indicator boxes for that alarm will be
highlighted.