


52 53
CHAPTER 6 PAN/TILT/ZOOM CAMERAS
CONTROL
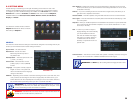
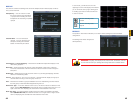
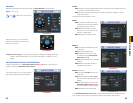
Selecting the Pan/Tilt/Zoom shortcut will open the Pan/Tilt/Zoom controls window
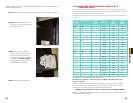
Speed – From 1 to 8
and adjust zoom, focus and iris
Using the mouse, you can control the
direction of the camera’s movements by
clicking on the arrows.
Intelligent Positioning Key - If your protocol supports it, clicking and dragging in the blue
button in the center will allow you to move the camera faster – between 4 to 16x
speed.
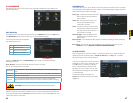
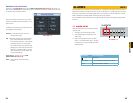
SETTING PRESET/PATROL/PATTERN/SCAN
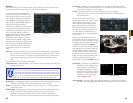
Clicking the Set button in the PTZ Control Panel (Picture 6-5) opens a new window in
addition to leaving the PTZ Control Panel active.
PICTURE 6-5
PICTURE 6-6
PICTURE 6-7
This window allows you to set up the PTZ’s
Preset, Tour, Pattern and Border functions.
Preset
STEP 1. Start by using the eight direction arrows on the PTZ Control Panel (Picture 6-5)
to position the camera where you want.
STEP 2. Click the Preset button in the Function list and enter the number you want to
assign to this preset.
This preset can now be added to a tour.
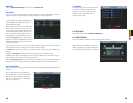
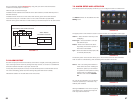
Patrol
STEP 1. Click the Patrol button in the
Function list and enter the number of
the preset you wish to add to it.
STEP 2. Click Add Preset to enter it
into the tour. You can have up to 80
presets in a single patrol.
STEP 3. Assign the patrol a number
Pattern
STEP 1. Click the Pattern button in the
Function list.
STEP 2. Click the Begin button
STEP 3. Modify the zoom focus and
iris settings using the PTZ Control
Panel (Picture 6-5)
STEP 4. Click the End button to save the
changes
STEP 5. Enter the desired number for
this pattern into the field.
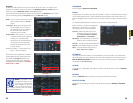
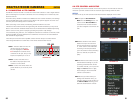
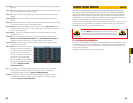
Border (Auto Scan)
STEP 1. Click the Border button in the
Function list
STEP 2. Select either the Left or Right
button to indicate which edge you are
defining
STEP 3. Use the direction arrows in the
PTZ Control Panel (Picture 6-5) to
move the camera to the limit desired.
STEP 4. Repeat for the other border.
PICTURE 6-8
PICTURE 6-9
In the PTZ Control Panel (Picture 6-5), clicking the PTZ Trace button will begin the auto
scan. The button will convert to a Stop button which can be used to end the scan.
PICTURE 6-10