


36 37
CHAPTER 5 MENUS
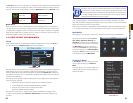
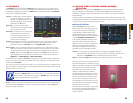
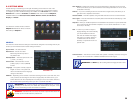
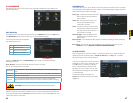
In the case of a hard drive error, the system will come directly to this menu. An error may be
indicated if the hard drive time and system time do not match. To resolve this issue, adjust
the time in the General setting menu located in the Setting menu (See Section 5.3) and
restart the system. Formatting the drive, using HDD Manage as described in Section 5.4
Advanced is another possible solution to drive errors.
If the drive is damaged or missing, you will need to install a drive. Please see Chapter 10 for
hard drive installation instructions.
Select View Recording Times to show files recorded on the DVR.
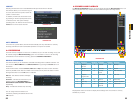
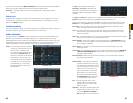
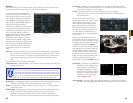
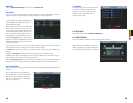
BPS
This window shows, in real time, the video
data stream for each camera in kilobytes per
second (KB/s) as well as the amount of space
each camera is writing to the hard drive in
megabytes per hour (MB/h). The green lines
for each camera will progress from left to
right.
PICTURE 5-4
PICTURE 5-5
PICTURE 5-6
PICTURE 5-7
PICTURE 5-8
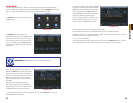
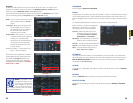
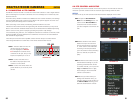
LOG
Any activity on the DVR is logged and recorded on the system. This information can be
viewed and searched from this window.
Information on user access, system
shutdowns, changes in recording status,
video loss and etcetera are listed. You can
search for activity in a similar manner to the
file search. This information can be backed
up to an external USB drive and it will be
saved as a text document.
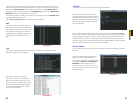
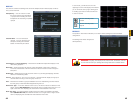
VERSION
This display shows system hardware and firmware specifications.
The hardware data shows the number of
channels the system is configured for along
with the number of alarms in and out that can
be utilized. The system’s serial number is also
displayed, along with the version and build
date of the firmware.
You can update the firmware using this menu. Check your product’s page at www.Q-See.
com to see if you have or need the latest version of the firmware. If your system is operating
without problems, we recommend that you do not update the firmware unless there is an
added feature that you need. To update the firmware, you must download the file from our
website and save it onto a removable USB drive that is otherwise empty. Connect the USB
drive to the port on the right side of the DVR and press Start.
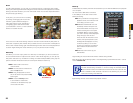
ONLINE USERS
A list of users accessing the DVR from over the network or through the Internet is shown in
this menu.
The user’s name as well as the IP address
used to access the DVR is displayed.
If you have proper system management rights
(Configured in Account, See Section 5.4
Advanced for full instructions), you can
disconnect or block a user. The maximum
time a user can be disconnected is 18 hours
(65,535 seconds).