


20 21
CHAPTER 4 BASIC OPERATION
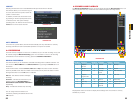
In Live View, along with the channel(s), you will see the system date and time displayed along
with the name and icons indicating the status of each channel. Setting the system date and
time and changing the channel names is covered in Section 5.3 under the Settings menu.
4.3 LOGIN, LOGOUT AND MAIN MENU
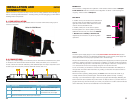
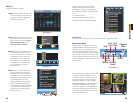
LOGIN
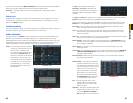
When the DVR starts up, the default video display is multiple window mode. Click Enter or
click the mouse and the System Login screen will be displayed.
SYSTEM LOGIN
User Name
Password
admin
OK Cancel
1
2 3
54 6
87 9
0
123
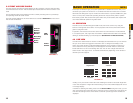
PICTURE 4-2
Using the mouse, front panel buttons or remote control, enter your user name and password.
Whenever the cursor is over a text field, a keyboard icon will appear to the right. Clicking
within the field itself will open the virtual keyboard as explained in Section 3.1. Clicking on
the keyboard icon allows you to cycle between numbers, letters (upper and lower case) and
symbols when appropriate.
Until new accounts are added, there are three types of pre-configured accounts available to
users who log into the DVR:
• Administrator (local and network) Username: admin Password admin
• Local Administrator Username: 888888 Password: 888888
• User (can only monitor, back up and play back video)
Username 666666 Password 666666
You must have access rights – whether as the system administrator or logged-in user –
in order to change settings. See Account in Section 5.4 for information regarding user
accounts.
Once you have logged in, the DVR will display one or more camera channels in Live View.
How many channels are displayed will depend on how many cameras you have connected as
well as what multi-view mode you have chosen.
After a period of inactivity – configurable in the General Setting submenu described in Section
5.3 – the DVR will log users out. This will require the current user to re-enter their password.
MAIN MENU
After logging in, you can view – and access - the DVR’s functions through the Main Menu.
IMPORTANT! It is highly recommended that you change your system
password after you log on for the first time. Record your changes and keep
that information stored securely as the system will prevent access if the
incorrect login information is attempted three times within a 30-minute period.
If you find yourself locked out of the DVR because of this, wait 30 minutes,
reboot the DVR and attempt to log into it again.
View 1
View 4
View 9
View 16
Pan/Tilt/Zoom
Color Setting
Search
Record
Alarm Output
Alarm Input
Main Menu
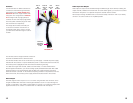
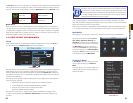
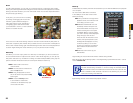
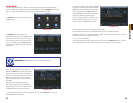
There are six submenus available; Search,
Info, Setting, Advanced, Backup and
Shutdown. Clicking on an icon will take you
to that function or the submenu it represents.
The Main Menu can be accessed at any
time from the Live View by right-clicking the
mouse and bringing up the Shortcut Menu.
Pressing the Return button on the side of the
DVR will also bring up the Main Menu.
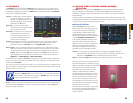
SHORTCUT MENU
In Live View mode, right-clicking anywhere
on the screen will bring up the Shortcut
Menu.
This menu allows you to quickly change your
viewing mode as well as moving directly to a
selection of menus.
PICTURE 4-3
PICTURE 4-4
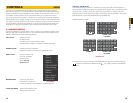
Recording Motion detected
Video loss Camera lock
Digital Zoom
When the mouse cursor is in a channel display a white magnifying glass icon will appear in
the upper left corner of that image. Clicking on this icon will add a blue check mark to it and
you will be able to digitally zoom in on a section of the video feed by clicking and dragging to
select the area. Right-click or uncheck the icon to return to normal view. This action can be
performed in single or multi-screen viewing modes.