


Page 50
Chapter 4
Installation Instructions
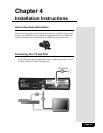
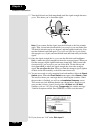
Sat In - Connect a coaxial cable between the DishPro LNBF and SAT
I
N on the back of the receiver. Peel off the blue sticker and affix it to
the cable close to where it connects to the S
AT IN connection on the
back of the receiver.
TV Set Out to a TV - Connect a coaxial cable between the TV SET
OUT on the receiver an the TV’s input. Peel off the white sticker and
affix it to the cable close to where it connects to the TV SET OUT
connection on the back of the receiver.
TV Set Out to a VCR (Optional) - Connect a coaxial cable between
the TV SET OUT on the receiver and the VCR’s input. Connect
another cable between the VCR’s output and the TV’s input.
Set the receiver to tune to channel 3 or 4 - Make sure the TV and
VCR (if installed) are on the channel you set in the 3/4 Modulator
screen. The receiver comes preset to channel 3. See Setting Up the
Receiver For Channel 3 or 4 on page 48.
Installing a DISH 500 Antenna
Note: If you have a Dish antenna system already installed, and the dish has been
pointed for the strongest possible signal strength, you can skip this chapter and
go directly to Appendix A to install the satellite receiver in an existing system.
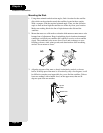
The first step in installing your dish antenna is to assemble the satellite dish,
mount it, and point it in the general direction of a satellite. To do this, follow
these instructions:
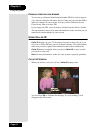
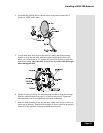
Finding the Satellites
You need to find the satellites in the sky. To do this, you need to know the
azimuth angle (the south, southeast, or southwest direction to the satellites) and
the elevation angle (the angle up to the satellites) from your location, and the
skew angle.
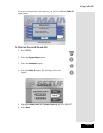
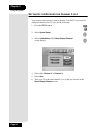
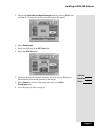
1. Make sure that the remote control batteries are fresh, and are installed
properly.
2. Turn ON the television and receiver.
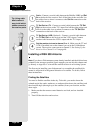
Tip: Using cable
labels makes it
easy to tell which
cables connect to
the receiver ports.