


Page 54
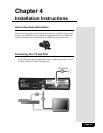
Chapter 4
Installation Instructions
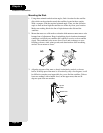
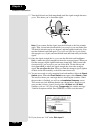
8. Thread the RG-6 coaxial cable through the mast support arm and
the Y-bracket. This cable should be long enough to run from your receiver
to your LNBF.
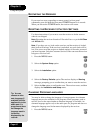
Note: See Running Coaxial Cables on page 67 for cable installation
guidance.
Note: You can have as much as 200 feet of cable between the DishPro
LNBF and the DishPro receiver. However, you must use only RG-6 coaxial
cables rated for 950 to 2150 MHz. Some cables may say "Swept tested for
2150 MHz." If you have any doubt about this, ask your DISH retailer, or
look on the container the cable came in. Do not use cable company TV
cables or cables from other satellite TV systems not rated for 950-2150
MHz. These other cables may cause signal loss. Do not use existing cables
such as RG-59. Also, be sure that any outdoor connections are made using
waterproof F-connectors.
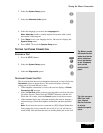
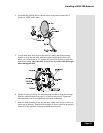
9. Attach the Y-bracket, using the Y-bracket screw.
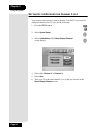
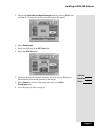
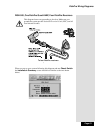
10. Connect the RG-6 cable from the DISHPro SAT IN connection on the back
of the receiver directly to port 1 of the DISHPro Twin LNBF, as shown
below. Be sure there are no multi-dish switches between the LNBF and the
receiver.
Tighten all of the coaxial cable connection only by hand. If you use
a wrench, you may over-tighten the connections and damage your
equipment. Such damage is not covered by the Limited Warranty.
11. Attach the LNBF to the Y-bracket using the two LNBF screws.
Connect to Port 1. It’s on
the left when the LNBF is
pointed towards you
Port 1
Port 2