


104
D824/D1624 Reference Manual (Changing the Initial Settings <SETUP mode>)
44.1kHz
SETUP
SIGNATURE
SURE?
42
∞
_
OL
0
87654321
30
24
18
12
9
6
3
161514131211109
44.1kHz
SETUP
SIGNATURE
42
∞
_
OL
0
87654321
30
24
18
12
9
6
3
161514131211109
Flashing
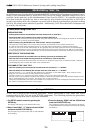
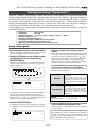
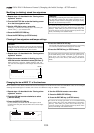
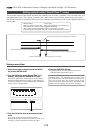
Modifying (or deleting) stored time signatures
1.Repeat steps 1-3 described in the “Storing a time
signature” section.
2.Turn the SHUTTLE dial so that the flashing cursor
is on the time signature value.
3.Use the JOG dial to enter a new value.
Entering [-/-] deletes the existing data. Note that you
cannot enter [-/-] for measure 001.
4.Press the EXECUTE/YES key.
5.Press the EXIT/NO key (or STOP button).
<Caution>
If modifying or deleting the stored time signature causes
the bar/beat setting for the tempo specified in the
“Setting a tempo” menu to disappear, the tempo setting
will also be automatically erased.
To cancel the setting operation, or to exit SETUP mode
after storing data, press the STOP button or the EXIT/
NO key. Each time you press one of these keys, the
recorder returns to the previous hierarchy level of the
menu, and finally exits SETUP mode.
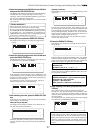
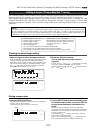
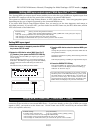
Clearing all time signature and tempo settings
<Caution>
Using this function will erase not only the time signature
setting but also the tempo data specified in the “Setting
a tempo” menu described in the next section.
1.Repeat steps 1-3 described in the “Storing a time
signature” section.
2.While the measure number is flashing, turn the
JOG dial counter-clockwise to select [All Clear ?].
When [All Clear ?] appears, [SURE ?] flashes, and you
can clear the time signature and tempo data in the next
step.
3.Press the EXECUTE/YES key.
The stored time signature and tempo data in its entirety
are cleared, and the initial settings are restored.
4.Press the EXIT/NO key (or STOP button).
To cancel the All Clear operation, press the STOP button
or the EXIT/NO key now. Each time you press one of
these keys, the recorder returns to the previous
hierarchy level of the menu, and finally exits SETUP
mode.
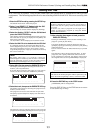
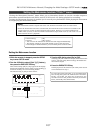
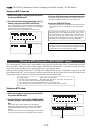
Changing the bar at ABS “0” of the time base
Bar in -002bar/1beat/00clk, which indicates the head figure of the disk in the time base BAR/BEAT/CLK, can be changed.
Although the initial figure is -002bar, this can be set within the range of -009bar ~ -002bar.
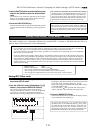
Flashing
1.Repeat steps 1-2 described in the “Storing a time
signature” section.
2.Turn the JOG dial counter-clockwise to select
[-002 bar Offset].
3.Press the EXECUTE/YES key.
[2] in [-002bar] will flash and the bar figure can be
changed with the JOG dial (Numbers that can be input
are 2~9.)
4. Use the JOG dial to enter a new value.
5. Press the EXECUTE/YES key.
6. Press the EXIT/NO key (or STOP button).
To cancel the setting operation, or to exit SETUP mode
after storing data, press the STOP button or the EXIT/
NO key. Each time you press one of these keys, the
recorder returns to the previous hierarchy level of the
menu, and finally exits SETUP mode.