


42
D824/D1624 Reference Manual (Punch In/Out)
PUNCH
REHEARSAL
TAKE
AUTO
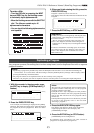
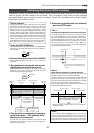
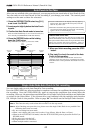
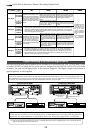
Auto Punch In/Out Take
After you are satisfied with your rehearsal, you can proceed to an actual take of Auto Punch In/Out.
You can undo or redo Auto Punch In/Out recording if you change your mind. The control panel
settings are the same as those for rehearsal.
Track 5
Track 6
Track 7
Track 8
Auto Punch In point
(Take In)
Track 1
Track 2
Track 3
Track 4
This part is changed.
Start point of
playback
Auto Punch Out point
(Take Out)
End point of
playback
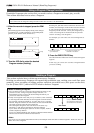
All tracks are in
playback monitoring
mode.
Only track 3 in input
monitoring.
The sound is not recorded to
this time. The RECORD
button lamp flashes.
All tracks are in
playback monitoring
mode.
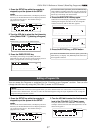
The recorder punches in
automatically at the Punch
In point.
The recorder punches out
automatically at the Punch
Out point.
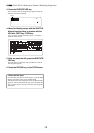
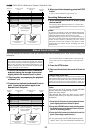
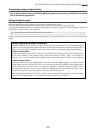
1. Press the RECORD TRACK select key [3/11]
to set track 3 to READY.
2. Locate a point slightly before the Auto Punch
In point.
3. Confirm that Auto Punch mode is turned on.
Press the AUTO PUNCH key to turn on the function, if it
is not already on (REHEARSAL/TAKE LED flashes).
4. Press the RECORD button while holding
down the PLAY button.
Only TAKE LED (red) lights up and starts TAKE.
• Track 3 indication on the display will only light up
between the AUTO PUNCH IN/OUT point, and will
flash in any other case.
• When the Auto Punch Out point is passed, the recorder
cancels Auto Punch mode automatically, and nothing
appears in the A. PUNCH display area.
<Caution after Punch Out>
At “Take” of punch out, the punch-in recording track
will not immediately enter the repro monitor mode from
the input monitor mode enter the repro monitor mode
about two seconds after mute playback. This is a
functional feature of recorder and not a malfunction.
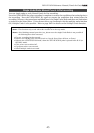
5. When you finish recording, press the STOP
button.
6. Play track 3 to check the result of the Auto
Punch In/Out operation.
If you fail with AUTO PUNCH IN/OUT and are not
satisfied, repeat the process by performing the AUTO
PUNCH IN/OUT undo operations described in the next
section.
Single Undo/Redo Auto Punch In/Out recording
You can single undo or redo Auto Punch In/Out recording.
Press the UNDO/REDO key after recording is complete to restore the conditions that existed prior to
the recording. Press the UNDO/REDO key again to restore the conditions that existed after the
recording. However, the procedures explained here is for Single Undo/Redo and there are limitations
as written in the Notes below. If the current drive was formatted with the multiple undo function
ON, Multiple Undo is also possible. Refer to page “64” for details on the Multiple Undo function.
<Notes at executing sigle undo/redo>
Note-1
: This function only works when this recorder is in the stop mode.
Note-2
: After finishing auto punch in/out, please note that single Undo/Redo is not possible if the
following have been executed.
• If a new recording has been made.
• When a new editing job is executed (such as Copy & Paste, Move & Paste, or Erase).
• When in the AUTO PUNCH ON mode, when the AUTO PUNCH IN point is passed in the PLAY (or
RECORD) mode.
• If the power was switched off.
• If program select was executed.
• When multiple undo is executed.