


118
D824/D1624 Reference Manual (Changing the Initial Setting <SETUP mode>)
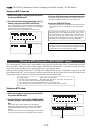
44.1kHz
SETUP
42
∞
_
OL
0
87654321
30
24
18
12
9
6
3
161514131211109
44.1kHz
SETUP
42
∞
_
OL
0
87654321
30
24
18
12
9
6
3
161514131211109
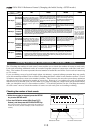
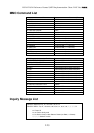
SPDIF :Async
SPDIF :Sync
adat :Async
adat :Sync
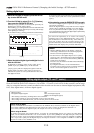
[D. in ?] setting
[Clock Sel ?]
setting
Int
Auto
Word
Video
clock received
from WORD IN
Available only when
installing the op-
tional Model 8345
TC/SYNC card. If
you try to select
“Video,” [Void w/o
Video] is displayed
and you cannot se-
lect it. See the ap-
pendix of the Refer-
ence manual for de-
tails.
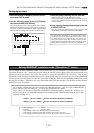
Regardless of receiving or not re-
ceiving word clock from WORD IN,
the recorder is referenced to the
internal clock. When the recorder
receives correct digital signals, the
[DIGITAL] indicator lights in the
display.
When receiving word clock from
WORD IN, the recorder automati-
cally synchronizes to the incom-
ing clock, while the [DIGITAL] and
[EXT SYNC] indicators light in the
display.
When receiving word clock from
WORD IN, the recorder synchro-
nizes to the incoming clock, while
the [DIGITAL] and [EXT SYNC] in-
dicators light in the display.
Regardless of receiving or not receiving word clock from WORD IN, the recorder synchronizes to the
external S/P DIF digital signal. When the recorder receives correct digital signals, the [DIGITAL] and
[EXT SYNC] indicators light in the display. When Digital In is set to a SYNC mode, if you try to select
[Clock Sel?] menu, The display will show [Clock Sel D.in!] (indicating that the clock is set to Digital In!)
and the recorder ignores your operation.
Regardless of receiving or not receiving word clock from WORD IN, the recorder synchronizes to
the external adat digital signals. When the recorder receives correct digital signals, the [DIGITAL]
and [EXT SYNC] indicators light in the display. When Digital In is set to a SYNC mode, if you try to
select [Clock Sel?] menu, The display will show [Clock Sel D.in!] (indicating that the clock is set to
Digital In!) and the recorder ignores your operation.
Regardless of receiving or not re-
ceiving word clock from WORD
IN, the recorder is referenced to
the internal clock. When the re-
corder receives correct digital sig-
nals, the [DIGITAL] indicator lights
in the display.
When receiving word clock from
WORD IN, the recorder automati-
cally synchronizes to the incom-
ing clock, while the [DIGITAL] and
[EXT SYNC] indicators light in the
display.
When receiving word clock from
WORD IN, the recorder synchro-
nizes to the incoming clock, while
the [DIGITAL] and [EXT SYNC] in-
dicators light in the display.
no clock
received from
WORD IN
no clock
received from
WORD IN
no clock
received from
WORD IN
no clock
received from
WORD IN
clock received
from WORD IN
clock received
from WORD IN
clock received
from WORD IN
When no word clock is received,
the recorder is referenced to the
internal clock, while the [EXT
SYNC] indicator flashes.
When no word clock is received, the
[EXT SYNC] indicator flashes
showing that the recorder cannot be
locked.
When no word clock is received,
the recorder is referenced to the
internal clock, while the [EXT
SYNC] indicator flashes.
When no word clock is received, the
[EXT SYNC] indicator flashes show-
ing that the recorder cannot be
locked.
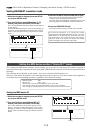
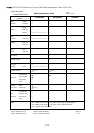
Checking the number of track events (“NOs Event ?” menu)
The “Checking the number of track events” menu enables you to check the number of events on each track.
Each track (including Additional tracks) of recorder Programs consists of consecutive audio files (and “zero”
files). The number of events represents the total number of audio files and 0 files. Each track can contain up
to 512 events.
If you are editing a song of typical length (about six minutes), repeated editing operation does not usually
cause this maximum number to be exceeded. (Exceeding this limit is called “event number overflow.”) Even a
20-minute song will not cause event number overflow. This is because the recorder system always optimizes
the data structure by keeping the number of events low. However, if a recording on a track is scattered in
different areas of the disk, or if you have made a very long recording on a single track and performed many
edits, you should be wary of “event number overflow.” To avoid this problem, use the “Checking the number
of track events” menu to check the number of events on each track prior to recording or editing.
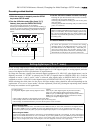
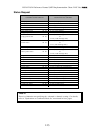
Checking the number of track events
Selected track number
The number of events on track 1
1.While the recorder is stopped, press the SETUP
key to enter SETUP mode.
2.Turn the JOG dial to select [NOs Event?] ([?]
flashes), and then press the EXECUTE/YES key.
The screen changes as follows, indicating the number of
events on track 1. (In this example, track 1 includes five
events.)