


47
D824/D1624 Reference Manual (Recording Digital Data)
Selecting a recording Program
1. If you already have multiple Programs, select the
desired Program using the Program Select
function.
* See page “
36
” for more information on the Program
Select function.
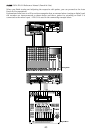
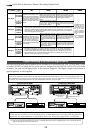
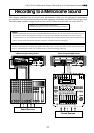
Setting the digital input
Use the digital input setup menu in Setup mode to
assign tracks and select a digital input clock.
With the default setting, the digital input is set to
[Analog] (no assign), which means no digital signal
can be input. To record digital signals from the
connected external device, you must set the digital
input to [SPDIF Async (asynchronous)] [SPDIF Sync
(synchronous)], [adat Async (asynchronous)], or
[adat Sync (synchronous)], depending on your
purpose. Depending on your selection, tracks are
assigned as follows:
* When SPDIF Async or Sync is selected:
<Both D824 and D1624>
Inputs 1-8 are assigned to tracks 1 and 2.
* When adat Async or Sync is selected:
<D824>
Inputs 1-8 are assigned to tracks 1-8.
<D1624>
Inputs 1-8 are assigned to tracks 1-8, and Inputs
9-16 are assigned to tracks 9-16.
To record data while synchronizing with a digital
signal from the external digital device, select
synchronous mode of [SPDIF] or [adat]. To record
data while synchronizing with the internal clock of
the recorder, select asynchronous mode of [SPDIF]
or [adat] and set the [Clock Sel?] menu (operation
clock setting) in Setup mode.
* See page “
113
” for more information on the [D. in?]
menu.
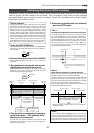
Setting the operation clock of the recorder
If you have selected synchronous mode for the digital
input tracks as described above, you must set the
operation clock in Setup mode.
1. Use the [Clock Sel ?] (operation clock setting)
menu to set the operation clock to [Int].
* See page “
117
” for more information on how to set
the operation clock.
Also, refer to the table on the next page for more
information on how to set the digital input tracks
and operation clock.
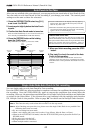
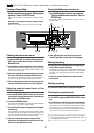
<Notes>
* If the digital input has been set up, do not connect
or disconnect an optical cable to or from the
DIGITAL/DATA IN jack. Otherwise, the D824 (D1624)
may generate noise, affecting the performance of
the external digital device.
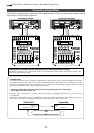
* If adat signals are input to the D1624, tracks not
assigned to the digital input are automatically
assigned to analog input. For example, if adat signal
is connected to the DIGITAL/DATA IN 9-16 jacks and
if you are not using Inputs 1-8 for adat input signal,
you can assign tracks 1-8 for analog recording and
tracks 9-16 for adat in to achieve 16-channel (analog
+ digital) simultaneous recording.
Setting recording tracks
Press the RECORD TRACK select keys of the tracks
selected in the digital input track menu to ready the
tracks for recording.
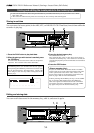
Recording
<Important!>
Be sure to input a digital signal (S/PDIF or adat)
of the same sampling frequency as that used on
the recorder.
1. Locate the beginning of the Program.
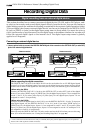
2. Make sure that the [DIGITAL] and [EXT SYNC]
indicators light up on the screen. While pressing
and holding down the RECORD button, press the
PLAY button to start recording.
3. Play the external digital device.
Make sure that the level meter segments light up and
move as the digital signal is being input.
Completing recording
4. After you finish recording, stop the recorder and
the connected digital device.