


D824/D1624 Reference Manual (Editing Tracks)
73
Flashing
44.1kHz
42
∞
_
OL
0
87654321
30
24
18
12
9
6
3
161514131211109
Flashing
44.1kHz
42
∞
_
OL
0
87654321
30
24
18
12
9
6
3
161514131211109
44.1kHz
42
∞
_
OL
0
87654321
30
24
18
12
9
6
3
161514131211109
44.1kHz
42
∞
_
OL
0
87654321
30
24
18
12
9
6
3
161514131211109
Flashing
44.1kHz
42
∞
_
OL
0
87654321
30
24
18
12
9
6
3
161514131211109
44.1kHz
42
∞
_
OL
0
87654321
30
24
18
12
9
6
3
161514131211109
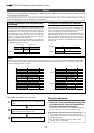
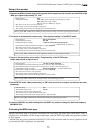
Executing Track Exchange
1.While the recorder is stopped, press the EDIT key.
2.With the JOG dial, choose “[Track Exchange?]”
menu.
3.Press the EXECUTE/YES key.
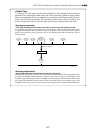
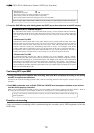
The display shows the track selection.
The current display shows that you can swap eight-track
data between Real tracks 1-8 and Additional tracks 9-
16. If you wish to select other tracks, follow the step
below.
Flashing
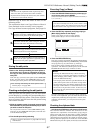
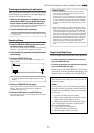
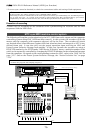
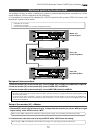
4. Select the tracks to swap data.
• Selecting Real tracks 1-8 and Additional
tracks 17-24:
1.Turn the SHUTTLE dial to move the flashing
[1-8] (left) indication to the flashing [9-16]
(right) indication.
2.Turn the JOG dial to change flashing [9-16]
to flashing [17-24] or [1-8].
Flashing
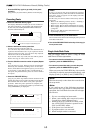
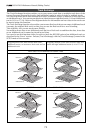
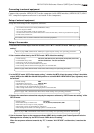
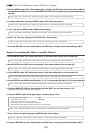
• Swapping mono track data between any
two tracks
1.When [1-8] is flashing, turn the JOG dial.
Turning the JOG dial allows you to select a mono
track from [1], [2], [3], [4]........ [24] in the left
column. The right column continues a mono
track.
For example, if you select [4] in the left column,
the display indicates [4<>1], meaning you can
swap data between tracks 4 and 1.
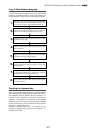
2.To select a number on the right, turn the
SHUTTLE dial as done for the left, to move
the flashing point. Then use the JOG dial
to select a specific track number.
* When you swap data between mono tracks,
the indications [Trk=04<->Trk=01] and
[Trk=01<->Trk=04], for example, mean the
same thing — swapping data between tracks
1 and 4.
<Note>
If you select the same tracks for swapping mono track
data, the setting is ignored. The recorder will indicate
[Select Err] for a short moment, then return to the
previous display.
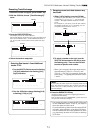
4.Press the EXECUTE/YES key.
[Exchange] lights up and the swapping operation is
completed immediately.
The recorder indicates [COMPLETED !], then returns to
the previous Time Base display.
* You cannot play data or check the REC END point
on the Additional tracks. To do so, you need to
move the data to a Real track.
If you load back-up data from the external DAT
recorder, adat machine, or backup SCSI drive,
the data maintains the same condition as when
you previously saved it to DAT, adat, or backup
SCSI drive.
Flashing