


16
206-4227
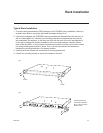
Typical System Installation
(see also Typical Setup Flow Charts and VPN Network Connections Overview diagrams)
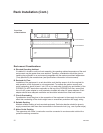
1. (Optional) To provide capacity for additional media/video playout channels, install a SATA
solid state drive (customer-supplied) in the SSD slot on the PCS200R rear panel. See
Reference section, “Using an SSD Storage Device with the PCS200R,” for further information.
2. If your system is using ASI output, make the following connections; otherwise, go to step 3.
• Connect a 75 ohm BNC-to-BNC coaxial cable between ASI OUT on the PCS200R and
ASI IN on the modulator.
• Connect an RF coaxial cable between IF OUT on the modulator and IF IN on the
upconverter.
Note: The BNC cable must be less than 30 feet (9.2 meters) in length.
3. To enable remote management, connect one end of a CAT5 RJ-45 Ethernet cable to the
Control Port on the PCS200R rear panel, and connect the other end of the cable to the
institution’s network.
4. Connect the PCS200R power supply to the POWER connector on the PCS200R rear panel.
Then, plug the AC power cord into a powered AC line receptacle. When power is applied,
the PWR (Power) LED on the PCS200R front panel will initially flash red and then turn green
(blinking during boot-up).
The boot-up process for the PCS200R may take up to two minutes. When boot-up is
complete, the PWR LED on the PCS200R front panel will light continuously green.
5. Once the PWR LED is lit continuously (no longer blinking), use the FTDI TTL-232R-5V-AJ
cable to connect a PC to the Service Port on the PCS200R rear panel.
6. Using HyperTerminal or an equivalent terminal emulation program on the PC, congure the
serial port as follows: Bits per second/baud = 115200; Data bits = 8; Parity = None; Stop
bits = 1; Flow Control = None
Note: To avoid conguration errors, make sure the keyboard settings on the terminal
emulator assign the backspace character to Ctrl + H (ASCII 8).
Once the connection is established, you should see a login prompt. (If the login prompt is
not automatically displayed, press Enter to refresh the screen.)
7. At the
login as:
prompt, type admin and press Enter. Then, at the
password:
prompt, type Password4Partners (case-sensitive) and press Enter.
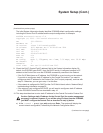
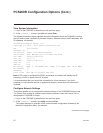
8. At the
Command >
prompt, type info and press Enter. (You can press Enter at any
PCS200R command prompt to view current menu, if desired.)
Note: After the system setup is complete, it is highly recommended that you
change the admin user password from its default value. See “Change the Login
Password” on page 28 for further information.
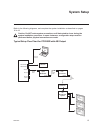
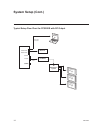
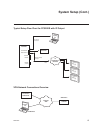
System Setup (Cont.)
(Continued on next page)