


60 Chapter 4. Netcommand Functions
Direct VCR Recording from an
Antenna or Cable Source
When your VCR is the current device, REC (record) on
the TV’s remote control functions the same as the record
button on the VCR’s remote control or front panel.
To record directly from antenna or cable:
• Method 1
1. Press DEVICE on the TV’s remote to display the
Device Selection menu. Highlight the traditional
VCR and press POWER to turn on the VCR. If
necessary, press GUIDE to select the input the
VCR is on, such as Antenna input (or line input).
2. Press ENTER to switch the TV to the VCR.
3. Select the correct channel for recording on the
VCR and then press REC to start recording. You
will need to manually stop the recording at the
end of the program
• Method 2
With the VCR as the current recording device, press
the DEVICE MENU button to display the VCR’s menu,
in which you can schedule a delayed recording
directly from antenna or cable.
To record from ANT-1, ANT-2 or other devices, see
NetCommand Controlled Recordings or refer to the TV
Guide On Screen® User’s Manual.
Copy-Protected Material
When attempting to record copy-protected material, the
Record functions of the NetCommand and IEEE 1394
systems may be prevented or stopped. If you have a
recording that is tagged “Record Once,” NetCommand
will change the tag to “Record No More.”
Restrictions for Traditional VCRs
with NetCommand- and TV Guide On
Screen-Controlled Recording
• Your VCR should be connected directly to the
RECORD OUTPUT AUDIO and VIDEO outputs.
• The VCR must be set manually to “Line Input.”
Display the Device Selection menu, highlight the VCR
and press GUIDE to change VCR inputs.
• If NetCommand is set up, the TV can select channels
on compatible cable boxes for recordings. Leave the
cable box turned on.
• If the source device or recording device does not
have separate power On and Off features, then leave
that device powered On.
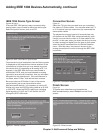
NetCommand®-Controlled Recordings, continued
Using TV Disc and A/V Discs
TV Disc and A/V Disc Search by Time
NetCommand is able to search to a specific time in a
recording on TV Disc or an IEEE 1394 A/V Disc.
1. Start the desired track’s playback on the A/V disc.
2. Use the number buttons to enter the time code
position of hours followed by minutes. For example,
to enter one hour and twenty-two minutes (1:22) into
the track, enter 1, 2, 2.
3. Press ENTER to skip to the time code position.
4. To cancel the request or to start over, press CANCEL
instead of ENTER.
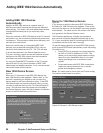
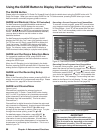
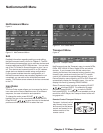
TV Disc and A/V Disc Track List
Screen
Figure 10
When viewing TV Disc or an A/V Disc, press GUIDE to
display its Track List. Tracks are listed in date and time
order and vary in size. Press ADJUST or to navigate
through the Track List. To play a track, select it on the
list, then press ENTER. Press INFO to see details for the
highlighted track. To change pages, press CH or . To
delete a track, select it on the list and press CANCEL.
Figure 10. Track List screen
IMPORTANT
The TV Disc is not intended for permanent
storage of recordings. Mitsubishi
recommends you transfer important
recordings to an external device such as a
VCR. If the TV Disc requires replacement or
repair, recordings stored on TV Disc will be
lost and cannot be recovered. Mitsubishi is
not liable for lost recordings.
• You cannot record from source devices connected
to the TV Component inputs or HDMI 1 or 2
connections.