


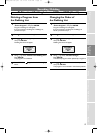


Recording / Dubbing
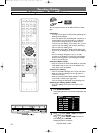
Front of this unit
Rear of this unit
HDD/DVD
HDD/DVD
S-VIDEO
AUDIO IN
VIDEO IN
HDD/DVD/VCR
COMPONENT
VIDEO OUT
IN
Y
P
B/CB
PR/CR
OUT
HDD/DVD
DIGITAL
AUDIO OUT
AUDIO
OUT
L
R
COAXIAL
L
R
AUDIO OUTANTENNA
IN
OUT
VIDEO OUT
L
R
HDD/DVD/VCR
OPEN / CLOSE
POWER
STOP/EJECT
REW F.FWDPLAY
REC/OTR
CHANNEL DUBBING VCR HDD DVD
S-VIDEO
STOP PLAY
HDD DVDREC/OTR
VIDEO L RAUDIO
VCRDVD
HDDDVD
RESET
S-VIDEO
HDD/DVD/VCR
IN
OUT
HDD/DVD
AUDIO IN
VIDEO IN
L
R
HDD/DVD/VCR
HDD/DVD/VCR
AUDIO IN
VIDEO IN
L
R
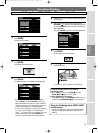
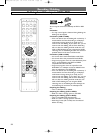
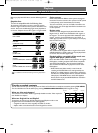
To LINE 2 IN To LINE 1 IN
External Device
(VCR camcorder etc.)
S-Video
cable
VIDEO
S- VIDEO
AUDIO
RL
VIDEO
S- VIDEO
AUDIO
RL
OUTPUT
OUTPUT
Audio
cable
Video
cable
S-Video
cable
Audio
cable
Video
cable
or
or
S-VIDEO
IN
HDD/DVD
HDD/DVD/VCR
HDD/DVD
S-VIDEO VIDEO LRAUDIO
Settings for the External Devices
Connect the external source properly to the unit by using input jacks either LINE2 (Front) or LINE1 (Rear).
When connecting an external equipment of monaural output to this unit,use AUDIO L jack of LINE
1 (Rear) or LINE2
(Front).Use commercially available S-Video or Video cable and an Audio cable for this type of connection.
VCR
VCR
DVD-R
DVD-R
DVD-RW
DVD-RW
Video
DVD-RW
DVD-RW
VR
HDDHDDHDD
1
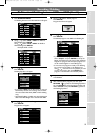
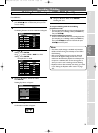
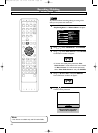
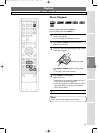
Press SETUP.
“Easy Setting Menu” or “Advanced Menu” will appear.
If “Advanced Menu” is displayed,proceed to step 3.
Example:VR mode DVD-RW disc
2
Using / ,select “Advanced Menu”.
Press
ENTER.
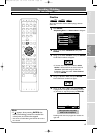
3
Using / ,select “Initial Setup”.PressENTER.
4
Using / ,select “Display”. Press ENTER.
Display Menu will appear.
DisplaDisplay
Screen SaScreen Saver
Select Select VideoVideo
FL DimmerFL Dimmer
OSD Language
Clock SettingClock Setting
Channel SettingChannel Setting
PlaybackPlayback
RecordRecord
DisplayDisplay
Reset to factory defaultReset to factory default
DVD MenuDVD Menu
HDD MenuHDD Menu
Initial SetupInitial Setup
Timer ProgramTimer Program
Easy Setting MenuEasy Setting Menu
Advanced MenuAdvanced Menu
HDD MENUHDD MENU
Initial SetupInitial Setup
DVD Disc FVD Disc Forormatmat
DVD Recording FVD Recording Forormatmat
FinalizFinalize
Disc ProtectDisc Protect
Delete PlaDelete Playlistylist
DVD DVD Menuenu
HDD HDD Menuenu
Initial SetupInitial Setup
Timer ProgramTimer Program
Advanced MenuAdvanced Menu
Easy Setting MenuEasy Setting Menu
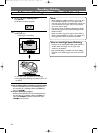
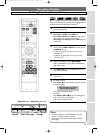
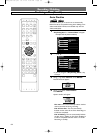
5
Using / ,select “Select Video”.
Press
ENTER.
Option window will appear.
6
Using / ,select the external input ;“L1” (Rear) or
“L2” (Front).
• If you are using the jacks on the rear,select
“L1”.
• If you are using the jacks on the front,select
“L2”.
Press
ENTER.
Option window will appear.
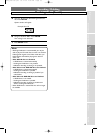
7
Using / ,select the video input type you use,
Video or S-Video,then press
ENTER.
Your setting is now activated.
• The default setting is
“Video In”.
8
Press SETUP to exit.
Video InVideo In
L1 (Rear)L1 (Rear)
S-Video InS-Video In
Select Select VideoVideo
L1 (Rear)L1 (Rear)
L2 (Front)
or
60
4380_029-065.qx3 05.11.16 2:29 PM Page 60