


64
RQT9131
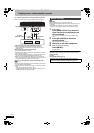
Copying still pictures
[HDD] [BD-RE] [RAM] [USB] [SD]
≥Pictures copied from SD card and USB memory will be
categorised according to the shooting date. Pictures without
shooting date will be categorised using the creation date.
≥You cannot copy pictures recorded to CD-R/CD-RW.
≥If the space on the destination drive runs out or the number of files/
folders to be copied exceeds the maximum (➡ 113), copying will
stop partway through.
≥You cannot copy the information about the picture rotation.
≥Timer recording will not start while copying still pictures.
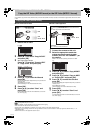
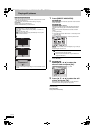
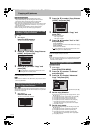
[USB] > [HDD]
1 While stopped
Insert the USB memory.
The menu is automatically displayed.
2 Press [3, 4] to select “Copy Pictures
(JPEG)” and press [OK].
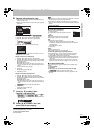
3 Press [2, 1] to select “Copy” and
press [OK].
≥ will be displayed on the Pictures by Date screen of the
Direct Navigator for the added pictures.
To stop copying
Press and hold [RETURN] for 3 seconds.
[Note]
≥The structure of folders on the USB memory may not be the same
at the copy destination.
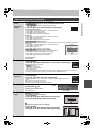
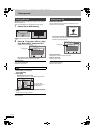
[SD] > [HDD]
This unit saves information about imported still pictures. Therefore, if
still pictures are imported from the same SD card, then only new still
pictures will be imported.
1 While stopped
Insert the SD card.
The menu is automatically displayed.
2 Press [3, 4] to select “Copy Pictures
(JPEG)” and press [OK].
3 Press [2, 1] to select “Copy” and
press [OK].
≥Protection of the card is
–Set: Copy will start
–Not set: Go to step 4
4 Press [2, 1] to select “Yes” or “No”
and press [OK].
If “Yes” is selected
Copied pictures in the SD card will be deleted after copying.
If “No” is selected
Pictures will not be deleted.
≥ will be displayed on the Pictures by Date screen of the
Direct Navigator for the added pictures.
To stop copying
Press and hold [RETURN] for 3 seconds.
[Note]
≥This unit saves the information on up to 12,000 still pictures and 30
SD cards. If additional still pictures are imported, then the older
information will be deleted.
[HDD] [BD-RE] [RAM] [SD]
1 While stopped
Press [FUNCTION MENU].
2 Press [3, 4] to select “To Others”
and press [OK].
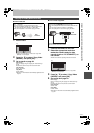
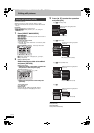
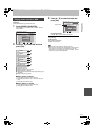
3 Press [3, 4] to select “Advanced
Copy” and press [OK].
≥If you are not going to change the registered list press [4]
several times (➡ step 7).
4 Set the copy direction.
≥If you are not going to change the copying direction, press
[4] (➡ step 5).
1 Press [3, 4] to select “Copy Direction” and press [1].
2 Press [3, 4] to select “Source” and press [OK].
3 Press [3, 4] to select the drive and press [OK].
4 Press [3, 4] to select “Destination” and press [OK].
5 Press [3, 4] to select the drive and press [OK].
The same drive as the copy source cannot be copied.
6 Press [2] to confirm.
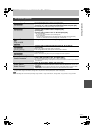
5 Set the copy mode.
≥If you are not going to change the recording mode, press
[4] (➡ step 6).
1 Press [3, 4] to select “Copy Mode” and press [1].
2 Press [3, 4] to select “Format” and press [OK].
3 Press [3, 4] to select “PICTURE” and press [OK].
“Recording Mode” is automatically set to “High Speed”.
4 Press [2] to confirm.
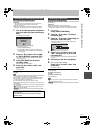
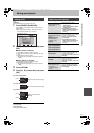
Copying all the still pictures on the USB
memory—Copy All Pictures
Copying new still pictures on the SD
card—Copy New Pictures
USB device
OK
RETURN
USB device is inserted.
Copy AVCHD
Copy Video ( MPEG2 )
Play Pictures ( JPEG )
Copy Pictures ( JPEG )
Play / Copy Music ( MP3 )
Copy All Pictures ( JPEG )
Copy from
USB
Copy to
HDD
Copy all pictures ( JPEG ) by date.
Copy Cancel
RETURN
OK
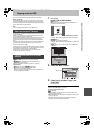
SD Card
OK
RETURN
SD card is inserted.
Play AVCHD
Copy AVCHD
Copy Video ( MPEG2 )
Play Pictures ( JPEG )
Copy Pictures ( JPEG )
Copying using the copying list
Copy added pictures ( JPEG ) by date.
Copy Cancel
RETURN
OK
Copy from
SD CARD
Copy to
HDD
Copy New Pictures ( JPEG )
Advanced Copy
SD CARD
HDD
1
2
3
Source
Destination
Cancel All
Copy Direction
Copy Mode
Create List
Start Copying
SD CARD HDD
PICTURE High Speed
Select the copy direction.
RETURN
0
DMRBW500GN-RQT9131-L_eng.book 64 ページ 2008年5月12日 月曜日 午前9時37分