


88
RQT9131
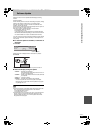
Changing the unit’s settings
Speaker
You can set the unit to output the best possible sound for your
speakers. (Only when connected to amplifier with HDMI AV OUT
terminal)
[Multi-Channel
] When using 3 or more speakers.
[2-Channel] When using two speakers
∫ When “Multi-Channel” is selected
≥It is only valid when the settings in “Digital Audio Output” are set to
“PCM”. (➡ 85)
≥If the delay cannot be set in the connected amplifier, set as
following depending on the connected speakers.
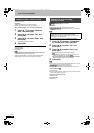
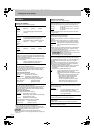
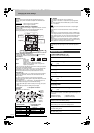
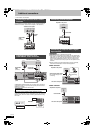
Speaker presence and size (A)
1
Press [
3, 4, 2, 1]
to select the speaker icon (
A
) and press [OK].
2
Press [
3, 4]
to select the setting and press [OK].
Icon examples:
Surround speaker (LS)
≥Large: Select when
the speaker
supports low-
frequency (under 100 Hz) reproduction.
≥Small: Select when the speaker does not support low-
frequency reproduction.
In order to make an ideal listening environment, settings of speaker
sizes may be automatically adjusted.
For example, if the subwoofer is set to “No”, the front speakers will
automatically be set to “Large”. (In this case, we recommend
connecting a speaker that can reproduce bass below 100 Hz.)
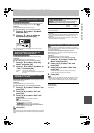
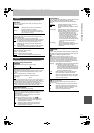
Delay time (B)
For optimum listening with 7.1/5.1-channel sound, all the speakers,
except for the subwoofer, should be the same distance from the
seating position.
If you have to place the centre, surround and surround back
speakers closer to the seating position, adjust the delay time to make
up for the difference.
If either distance D or F is less than E, find the difference in the
relevant table and change to the recommended setting.
1 Press [3, 4, 2, 1] to select the delay time box (B) and press
[OK].
2 Press [3, 4] to select the setting and press [OK].
ms
ms
L
Complete
LS
R
SW
RS
ms
LB RB
0.0
0.0
0.0
C
Subwoofer
Front (R)
Centre
Front (L)
Complete
(LS)
Surround
(RS)
Surround back
(RB) (LB)
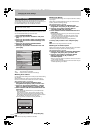
LS
LS
NoLarge Small
E
FD
L
LS
R
SW
C
RS
C
RS
LS
D
E
F
L
LB
R
RS
SW
C
RB
C
RB
RSLS
LB
D
E
F
F
LS
Approximate room dimensions
Circle of constant primary listening distance
: Actual
speaker
position
: Ideal
speaker
position
: Primary
listening
distance
5.1ch speaker
connection
7.1ch speaker connection
D Centre speaker F Surround/Surround
back speakers
Difference Setting
Approx. 34 cm
1.0 ms Difference Setting
Approx. 170 cm
5.0 ms
Approx. 68 cm
2.0 ms
Approx. 102 cm
3.0 ms
Approx. 340 cm
10.0 m
Approx. 136 cm
4.0 ms
Approx. 510 cm
15.0 m
Approx. 170 cm
5.0 ms
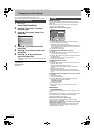
AV1 Output
Set according to the terminal of the connected TV.
Select “Video” or “S Video” for component output (progressive
output).
If this unit is connected with an HDMI cable, you cannot select
“RGB 1” or “RGB 2”.
[Video
]
Select when a TV is connected that can receive a composite signal.
[S Video]
Select when a TV is connected that can receive an S Video
signal.
[RGB 1]
Select when a TV is connected that can receive an RGB signal.
If you always would like to view the picture from the unit in RGB
signal, select this mode. The TV screen will automatically switch
to display the picture from the unit when the unit is turned on.
[RGB 2]
Select when a TV is connected that can receive an RGB signal.
If you would like to switch to display the picture from the unit only
when playback or viewing menus, select this mode.
AV2 Input
Set according to the output signal of the connected equipment.
[Video
]
[S Video]
Network Settings
IP Address/DNS Settings (➡ 90)
≥Press [OK] to show the following settings.
Connection Test
[--]
IP Address Auto-assignment
[On] [Off]
IP Address
[---.---.---.---]
Subnet Mask
[---.---.---.---]
Gateway Address
[---.---.---.---]
DNS-IP Auto-assignment
[On] [Off]
Primary DNS
[---.---.---.---]
Secondary DNS
[---.---.---.---]
Connection Speed Auto-configure
[On] [Off]
Connection Speed Setting
This is enabled only when “Connection Speed Auto-configure” is
turned “Off”.
[10BASE half duplex] [10BASE full duplex]
[100BASE half duplex] [100BASE full duplex]
Proxy Server Settings (➡ 91)
≥Press [OK] to show the following settings.
Initialize
Set the setting of the “Proxy Server Settings” back.
Proxy Address
(The initial setting blank.)
Proxy Port Number
(The initial setting is “0”.)
DMRBW500GN-RQT9131-L_eng.book 88 ページ 2008年5月12日 月曜日 午前9時37分