


90
RQT9131
Changing the unit’s settings
These settings are used if you will connect this unit to a network.
The connection to the Internet may take time or the internet may not
be connected depending on the connection environment.
It is recommended that you use a broadband connection.
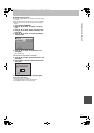
∫ Testing the connection
Always test the connection when a LAN cable is connected or when
new “IP Address/DNS Settings” have been made.
1 Press [FUNCTION MENU].
2 Press [3, 4] to select “To Others” and press
[OK].
3 Press [3, 4] to select “Setup” and press [OK].
4 Press [3, 4] to select “Network Settings” and
press [OK].
5 Press [3, 4] to select “IP Address/DNS
Settings” and press [OK].
6 Press [3, 4] to select “Connection Test” and
press [OK].
“Testing”: The test is in progress.
“OK”: The connection is completed.
“Failed”: Please check the connection and settings.
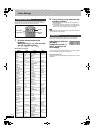
∫ Setting the IP address
In most cases, default settings can normally be used without making
any changes.
Set the IP address only when the router has no DHCP server
functions or when the router’s DHCP server function is disabled.
After performing steps 1–5 (➡ above)
6 Press [3, 4] to select “IP Address Auto-
assignment” and press [2, 1] to select “Off”.
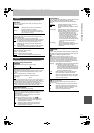
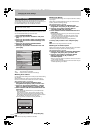
7 Press [3, 4] to select “IP Address”, “Subnet
Mask” or “Gateway Address” and press [OK].
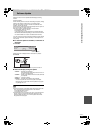
8 Enter numbers with the numbered buttons and
press [OK].
≥After checking the specifications for your broadband router,
enter each number.
If the number is unknown, then check the number of other
devices such as personal computers connected via a LAN
cable. Assign a different number from those of other devices for
the “IP Address” and the same number for others.
≥If a wrong number is entered, then press [DELETE ¢].
9 Press [2, 1] to select “Yes” and press [OK].
[Note]
≥The numeric input range is between 0 and 255.
∫ Setting the DNS-IP
In most cases, default settings can normally be used without making
any changes.
When setting an assigned DNS server from your internet service
provider, perform the following settings.
After performing steps 1–5 (➡ left)
6Press [3, 4] to select “IP Address Auto-
assignment” and press [2, 1] to select “Off”.
7Press [3, 4] to select “Primary DNS” or
“Secondary DNS”and press [OK].
8 Enter numbers with the numbered buttons and
press [OK].
≥Follow the instructions given by your internet service provider
and enter the numbers.
If the number is unknown, then check the number of other
devices such as personal computers connected via a LAN
cable and assign the same number.
≥If a wrong number is entered, then press [DELETE ¢].
9Press [2, 1] to select “Yes” and press [OK].
[Note]
≥The numeric input range is between 0 and 255.
∫ Setting the connection speed
When the connection test results in “Failed” after the IP and DNS-IP
addresses are assigned, perform the following settings.
After performing steps 1–5 (➡ left)
6Press [3, 4] to select “Connection Speed Auto-
configure” and press [2, 1] to select “Off”.
7Press [3, 4] to select “Connection Speed
Setting” and press [2, 1] to select a
connection speed.
≥Select a connection speed in accordance with the environment
of the network connected.
≥When the settings are changed, the network connection may be
disabled depending on the device.
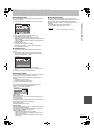
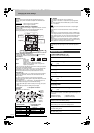
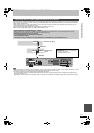
Network Settings
Preparation
Connect to the network. (➡ 98)
RETURN
OK
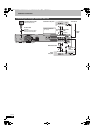
IP Address / DNS Settings
Connection Test
䋭䋭
䋭䋭
On
On
On
On
On
On
㪄㪄㪄㪅㩷㪄㪄㪄㪅㩷㪄㪄㪄㪅㩷㪄㪄㪄
㪄㪄㪄㪅㩷㪄㪄㪄㪅㩷㪄㪄㪄㪅㩷㪄㪄㪄
㪄㪄㪄㪅㩷㪄㪄㪄㪅㩷㪄㪄㪄㪅㩷㪄㪄㪄
㪄㪄㪄㪅㩷㪄㪄㪄㪅㩷㪄㪄㪄㪅㩷㪄㪄㪄
㪄㪄㪄㪅㩷㪄㪄㪄㪅㩷㪄㪄㪄㪅㩷㪄㪄㪄
㪄㪄㪄㪅㩷㪄㪄㪄㪅㩷㪄㪄㪄㪅㩷㪄㪄㪄
㪄㪄㪄㪅㩷㪄㪄㪄㪅㩷㪄㪄㪄㪅㩷㪄㪄㪄
㪄㪄㪄㪅㩷㪄㪄㪄㪅㩷㪄㪄㪄㪅㩷㪄㪄㪄
㪄㪄㪄㪅㩷㪄㪄㪄㪅㩷㪄㪄㪄㪅㩷㪄㪄㪄
㪄㪄㪄㪅㩷㪄㪄㪄㪅㩷㪄㪄㪄㪅㩷㪄㪄㪄
䋭䋭
䋭䋭
IP Address Auto-assignment
IP Address
Subnet Mask
Gateway Address
DNS-IP Auto-assignment
Primary DNS
Secondary DNS
Connection Speed Auto-configure
Connection Speed Setting
MAC Address: 00-0b-97-e6-7a-ae
192
.
.
.
1
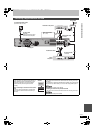
IP Address
Please input IP Address and press “OK”.
The IP address will be cleared by pressing
“OK” when there is no number input.
0 - Number9
DMRBW500GN-RQT9131-L_eng.book 90 ページ 2008年5月12日 月曜日 午前9時37分