


9
RQT9306
Quick Start
Guide
STEP 2 Channel reception settings and TV aspect settings
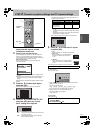
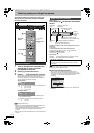
1 Turn on the television and select the
appropriate AV input to suit the
connections to this unit.
2 Press [Í] to turn the unit on.
When connecting to a television that has the VIERA Link
functions (> 36), downloading from the television starts.
You can download the tuning positions from the television for
the channels in this unit’s channel coverage.
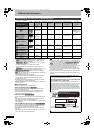
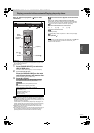
DVB Auto Setup starts.
The unit will search for the terrestrial digital channels.
This takes 5 minutes.
≥Terrestrial digital channels are stored into logical channel
numbers.
≥Analogue channels are preset at the time of shipping. If you
would like to add new TV channels, set them manually
(> 60).
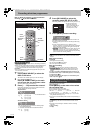
DVB Auto Setup is complete when Region Selection screen
appears.
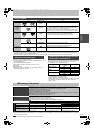
3 Press [3, 4] to select your region
and press [OK].
The time information for your region can be obtained.
≥If the clock setting screen is displayed (> right)
4 Press [3, 4] to select “On” or “Off”
and press [OK] when the “Power
Save” setting menu appears.
The features of the power save function when the unit is in
standby mode are as below.
§1
“FL Display” is set to “Automatic” in the Setup menu.
(> 62)
§2
It is possible to startup and start recording within several
seconds.
–Depending on the type of TV or the connected terminal, it
may take time to display the screen.
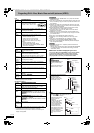
If the TV aspect setting screen appears on the television
5 Press [3, 4] to select the TV aspect
and press [OK].
≥16:9:
When connected to a 16:9 widescreen television
≥Pan & Scan:
When connected to a 4:3 aspect television,
side picture is trimmed for 16:9 picture
(> 81).
≥Letterbox:
When connected to a 4:3 aspect television.
16:9 picture is shown in the letterbox style
(> 81).
When television picture appears, set up is complete.
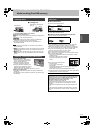
In step 3, if the clock setting screen appears on the television, set
the clock manually.
This is a 24-hour clock.
1 Press [2, 1] to select the item you want to change and press
[3, 4] to change the setting.
The items change as follows:
Hour!#Minute!#Second!#Day!#Month!#Year
^-----------------------------------------------------------------------------------------J
≥You can also use the numbered buttons for setting.
2 Press [OK] when you have finished the settings.
Power Save setting screen appears.
(> Go to step 4)
To stop partway
Press [RETURN ].
≥On: It will go into the Power Save mode when the unit
is in standby condition.
≥Off: It is possible to start quickly from the standby
mode. (Quick Start mode)
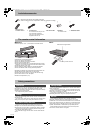
VOL CH
STATUS
MANUAL SKIP
CREATE
CHAPTER
F
U
N
C
T
I
O
N
M
E
N
U
D
I
R
E
C
T
N
A
V
I
G
A
T
O
R
G
U
I
D
E
RETURN
PLAY/x1.3
PAUSE
STOP
SLOW/SEARCH
SKIP
CH
PAG E
SELECT
INPUT
0
9
8
7
6
54
3
2
1
AV
Í
TV
DRIVE
SELECT
Í
DELETE
EXIT
OK
OPTION
ANALOGUE
CH
G-Code
AUDIO
DISPLAY
Í
3,4,2,1
OK
RETURN
Numbered
buttons
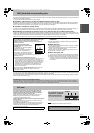
DVB Auto Setup
Scan CH 6 69
CH
Quality
Channel Name Type
RETURN
TV : 1 Radio : 0 Data : 1
ABC
ABC 2
1
2
TV
Data
9
9
Searching...
Region Selection
OK
RETURN
SELECT
Queensland
NSW / ACT
Victoria
South Australia
Western Australia
Northern Territory
Tasmania
Power Save
On : Minimises standby power
consumption, disables Quick
Start function. FL Display is
set to "Automatic".
On
Off
Power Save
On
§1
Off
Power consumption Approx. 2 W Approx. 15 W
Startup time Not Quick
Quick
§2
Watching the picture
from the device
connected to AV2
Cannot do Can do
When clock setting screen is displayed
∫ To confirm that stations have been tuned
correctly (> 60)
∫ To restart set up (> 59)
TV Aspect
16:9
Pan & Scan
Letterbox
16:9 WIDE TV
4:3 TV
OK
RETURN
SELECT
Clock
Time Date
0
:
00 :
00
1
. 1
.
2009
Please set the clock.
OK: access RETURN: leave
0 9
Number
OK
RETURN
SELECT
CHANGE
DMREX79GN-RQT9306-L_eng.book 9 ページ 2009年3月24日 火曜日 午後2時38分