


60
VQT2J51
Copying Still Pictures
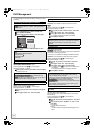
4 Register still pictures for copy.
–If you are going to copy a registered list without making any
changes to it (> step 5).
You can register still pictures or still picture folders.
–Still pictures and folders cannot be registered on the same list.
To register individual still pictures
1 Press [3, 4] to select “Create List”, then press [1].
2 Press [3, 4] to select “New item”, then press [OK].
3 Press [3, 4, 2, 1] to select the still picture, then press [;].
A check mark is displayed. Repeat this step until you select all
necessary items.
≥Press [;] again to cancel.
≥The items will be copied in the order of the copying list. If
you want to specify the order, repeat selecting one item at a
time.
–To show other pages (> 61, Tips)
–To select another folder (> 61, Tips)
4 Press [OK] to confirm.
–To edit the copying list (> right)
5 Press [2] to confirm.
To register on a folder by folder basis
1 Press [3, 4] to select “Create List”, then press [1].
2 Press [3, 4] to select “Picture/Folder”, then press [OK].
3 Press [3, 4] to select “Folder”, then press [OK].
4 Press [3, 4] to select “New item”, then press [OK].
5 Press [3, 4] to select the folder, then press [;].
A check mark is displayed. Repeat this step until you select all
necessary items.
≥Press [;] again to cancel.
≥
The items will be copied in the order of the copying list. If you
want to specify the order, repeat selecting one item at a time.
–To show other pages (> 61, Tips)
6 Press [OK] to confirm.
7 Repeat steps 4–6 until you select all necessary folders.
–To edit the copying list (> right)
8 Press [2] to confirm.
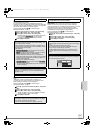
5 Press [3, 4] to select “Start Copying”, then press
[OK].
6 Press [2] to select “Yes”, then press [OK] to start
copying.
Select the item in step 4–4 (for a still picture) (> left) or
4–6 (for a folder) (> left)
Press [OPTION].
After performing steps 1–3 (> left)
4 Press [3, 4] to select “Cancel All”, then press [OK].
5 Press [2] to select “Yes”, then press [OK].
≥ The settings and lists may be cancelled in the following
situations.
– When a still picture has been recorded or deleted at the copy
source
– When steps have been taken, for instance, to turn off the
unit, remove the USB memory, open the tray, etc.
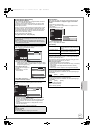
[RAM] > [RAM]
After performing steps 1–3 (> 58, Copying Titles or Playlists
(DVD > VHS))
1 Set “Source” and “Destination” to “DVD”. (
>
step 4)
[USB] > [ RAM]
1 While stopped
Insert the USB memory (> 7).
The menu is automatically displayed. (> 42)
2
Press [
3
,
4
] to select “Picture ( JPEG )”, then press
[OK].
3 Press [3, 4] to select “Copy Selected Pictures
( JPEG )”, then press [OK].
–“Source”, “Destination”, “Format” and “Recording Mode” are
automatically set to “USB”, “DVD”, “PICTURE” and “High
Speed” respectively.
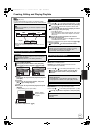
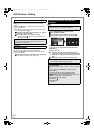
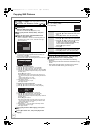
Copy
Select the copy direction.
USB
DVD
1
2
3
Source
Destination
Cancel All
Copy Direction
Copy Mode
Create List
Start Copying
USB DVD
PICTURE
High Speed
0
OK
RETURN
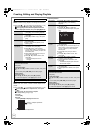
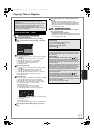
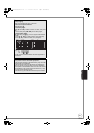
Copy
Destination Capacity: 4343MB
No. Size
1
2
3
Cancel All
Picture
Copy Direction
Copy Mode
C t Lit
Picture/Folder
USB DVD
PICTURE
High Speed
Name of item
New item (Total=0)
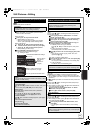
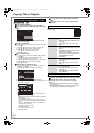
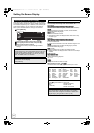
Copy
Destination Capacity: 4343MB
No. Size
1
2
Cancel All
Picture
Copy Direction
Copy Mode
Picture/Folder
USB DVD
Name of item
New item (Total=0)
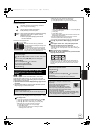
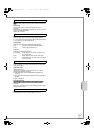
Edit the copying list
Delete All Delete all items registered on the copying list.
1. Press [3, 4] to select “Delete All”, then press
[OK].
2. Press [2] to select “Yes”, then press [OK].
Add Add new items to the copying list.
1. Press [3, 4] to select “Add”, then press [OK].
2. Press [3, 4, 2, 1] to select the still picture
or folder to be added, then press [;].
A check mark is displayed. Repeat this step
until you select all necessary items.
≥Press [;] again to cancel.
3. Press [OK].
Delete Delete the selected items.
1. Press [
3
,
4
] to select “Delete”, then press [OK].
2. Press [2] to select “Yes”, then press [OK].
Cancel all registered copying setting and lists
Add
Delete
Delete All
DMR-EZ49VEB_VQT2J51.book 60 ページ 2009年12月21日 月曜日 午後5時40分